Monday, March 31, 2008

[wip] Yuki Nagato


[ 03.06.08 ]

I've started working on this BUBBA Yuki Nagato to complement the BUBBA Haruhi Bunny. This is going to be a real WIP, in that I am posting while it's still in progress and not as an afterthought. I'm going to keep this as a single post and edit it with updates as it progresses.


Flash removed and pinned. You can see red marks on the resin. I use a red Sharpie while removing the flash to mark areas that need more work so I don't forget later. All of the red marks need to be fixed and removed before painting.


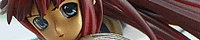
This is how my eyes start out. Eyes are painted white and the base colors for the iris applied. I do this first because at this point, it is easy to strip and redo if I don't like the results. Eyes may be the most important part of a kit, as I have seen perfectly painted kits with bad eyes and it ruins the whole thing. So I make sure they are right from the start. Once they are the way I want them, it's an easy matter to mask over them and finish the face.


[ 03.09.08 ]

Here's my workspace tray (from Ikea), which has all the parts for the kit. It's easy to pick up and move around, and easy to hide away if I have company over. The rim makes it hard to lose any parts and spills wipe away easily. It fits my cutting boards too.


These parts have been painted with a base coat with some clean up being done. Some of the parts have been shaded, but the rest are just flat coats. There's some difficulty here in how to get rid of the seams, since the breakdown is a bit odd, the seams will have to be filled in after assembly and those areas carefully repainted. If you don't care about the seams, then you can paint the whole thing now and just assemble it, but I want the hair and the collar seamless, so it's going to be 2 steps for me.


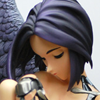
The face is mostly complete, but will need a final matte finish on the skin tone.


[ 03.12.08 ]


I did the shading of the uniform tonight. The blue is a custom mix of blue green, the base coat is more green and the highlights are more blue. The result looks much better than just having a solid color. What's left is the socks and shoes, assembly, fix the seams and repaint the seam areas. Then...


..another guitar. This one should be easier as it'll just be painted a gloss white and black, same colors as in the anime. There's just a lot of tiny pieces to it.


[ 03.14.08 ]


It's White Day, so tonight I painted white (it's just a coincidence). This is the reason I disassembled and cleaned my airbrushes yesterday - white is kind of a tricky color to spray (at least for me). If there's any paint residue in the brush, it can easily ruin a perfect coat of white. I learned that the hard way, so now I make sure the brush is completely clean before spraying white or clear.


[ 03.17.08 ]


Busy this weekend, so not much progress. I started building the tuner assemblies Sunday night and puttied the collar of the cloak. I did some shading tonight - added an off-white to the shoes and shaded the hands and legs. Cleaned up some issues with the guitar and gave it a second coat of white.


[ 03.23.08 ]


I started assembling the main body and head. The hair is puttied, sanded and painted. The cloak is finally sanded and ready for painting (I forgot about it). If I had planned it right, I could have painted it with the guitar parts, which are all base coated black before a metallic is applied. I've decided to paint the tuners a gold/brass color to go with the white guitar. There's some progress on the socks and shoes, but I'm still deciding on how to shadow the shoes, maybe a light brown would work.


[ 03.26.08 ]


Except for some clean up and detail work, all the parts are painted. What's left is to clear coat and apply the appropriate finish, then assemble the whole thing. You can see all the tiny guitar parts here with their metallics over gloss black. If you use thin layers, you can control how much black shows through and get some subtle shading through the metallic color. It looks so much better this way, otherwise spraying over the metallic will just dull it. I should be done this weekend, so this will probably be the last WIP in this series. Oh, the cat, I'm going to save for a later date.


[ 03.29.08 ]

One more post to detail the guitar headstock build, which I didn't do for the Haruhi guitar wip. From left to right: tuner assemblies, guitar base, tuners pinned-thru, and finished headstock.


I build the tuner assemblies with extra long pins for painting, so there's enough space for the clamps to hold. At this point, the pins are only glued to the tuners, not the caps, which are held by friction. Once painted, the caps are twisted off and the pins cut to the proper size - they will go from the bottom of the headstock through the top with about 1mm of the pins above the surface. The caps are then glued onto the pins with CA glue and the headstock is ready to be strung when the glue cures.


Here's the completed guitar with a test fit on the figure. This kit didn't come with strings, so I used 6lb test line (fishing line) from the sporting goods department. The string is glued under the bridge, then pulled tight and tied on the tuning cap. Leave some excess, so you can pull the knot tight and a dab of CA glue holds it in place. Once it's fully cured, I'll trim the excess to about 3mm or so.

This is also the first picture of the unwrapped head and everything turned out nicely. Notice there's no visible seam on the top of the hair - all 3 hair pieces blend together smoothly. Well worth the extra time spent.


[ complete ]

Not being one to leave anything alone, I ended up adding some more detail to the guitar. Lining the base of the pick guard and painting the back plate black. You can see the finished results in the Yuki gallery.

( ... read more » )

Thursday, March 13, 2008

Ultrasonic Cleaning

I just bought an ultrasonic cleaner to clean my airbrushes - disassembled them and put all the parts into the cleaner, filled with water and the manual suggests a few drops of liquid detergent, but I put in a few drops of windex instead to help break down any dried acrylic. I wasn't expecting too much, but they actually came out very clean - and much easier than what I had been doing.

I picked up the ConAir model JC3SB from a local Bed, Bath and Beyond using a $25 Discover reward card and a 20% off coupon that seem to breed in my mailbox. The total came to around $18 out of pocket, so I am quite pleased. I'm not sure if it can be used to clean resin parts too, but I think I will give that a try in the future.


Above: Disassembled dirty Masters G44 in the ultrasonic cleaner.
Below: Reassembled clean Masters G44 on the left, Eclipse HP-BCS on the right and cleaning brushes on top which are still useful for daily cleaning.


Also, here's my home-made spraying booth using a surplus filter fan mounted in a box with exhaust duct. It cost about $30 for the fan with filter and $20 for the wood, duct and reducers. The "hood" is made from an amazon.com shipping box, which I have plenty of, so it is easily replaced.


It's a down draft design, so air flows down with the overspray (taking advantage of gravity), but the vents are mounted facing back so I'm not spraying directly into the filter. Most of the overspray hits the hood and vents and anything left gets sucked into the filter, which is washable and reusable.

It works really well, even at high pressure spraying, though I still wear a respirator just in case. The large binder clip on the right side makes for a cheap airbrush holder when there's paint in the cup.

( ... read more » )

Monday, March 10, 2008

WoW-Freedom

Having spent 2 years of my life in WoW, I am now officially WoW-free for a year as this marks the anniversary of my account expiration. I actually stopped actively playing sometime in mid January, a few weeks after Burning Crusade was released as I found myself wondering why I was paying Blizzard to play a game I had already played just for new graphics and to keep up with the Jonses.

I played a horde mage named Sputnik on a PvP server grinding up the PvP ranks to General, and indeed half way towards Warlord, when the PvP honor changes occurred. In some ways, the months of honor grinding for gear (which was now being given away for almost free) marked the end of the game for me. I still tried to give BC a chance, but with a record number of players in the same zone filled with quests collecting items with a 0.0001% drop rate (which we affectionately called "livers"), I could stand it no more.

With 2 months still paid on my account, I decided to let it expire. This money making machine of Blizzard has no end - there's no goal to look forward to and all it takes is another patch to keep you playing catch-up for the next set of gear (and more subscription money).

I wouldn't have reached out to other forms of entertainment and hobbies if I hadn't quit. As well, I had renewed focus in my day job which lead to two promotions that year - far better returns than my night and weekend "job" in WoW with nothing to show for it but digital bits. I also had renewed interest in playing music and found an artistic outlet in building the resin kits shown in this blog. None of which would have happened if I stayed on the WoW treadmill.

R.I.P. Sputnik.

( ... read more » )

Saturday, March 1, 2008

[wip] Haruhi Guitar

Here are some "work in progress" pictures of the Haruhi guitar I found while digging through the photos for the stockings. I would say that the guitar was the hardest part of this kit since it contains so many tiny pieces and could easily induce build paralysis at times - simply because you don't know where to start or what to do next.

Sometimes you just have to do something, even if you don't know how it will all fit together, so just focus on one part at a time.

I started with the main guitar body. I had an idea on how I wanted to paint it, so it was the easiest to start with. All the holes are plugged up with masking tape so that after painting, the resin can be easily exposed when it comes time to glue the parts together. When gluing, you want the glue to adhere to the resin surface, not to a painted one or else the bond is only as strong as the paint.


This is clearly a chore in masking technique, the white panel and the wood body are molded together, so you have to mask one and then the other. I chose to mask the panel first, paint the body, then mask the body and paint the panel. However, I masked the body too soon and the tape reacted with the paint layer - you can see the uneven surface at the top and where I started sanding it down at the bottom. It's not a big problem, as it will just get repainted after cleaning it up, but the lesson learned is to wait until the paint fully cures before masking.


This is the back of the guitar body with a wood grain applied (it is dry brushed on). Here's how I did it. A base color of tan is sprayed over the whole part (the same color as the inside of the sound hole). Using a wide (1/2") stiff bristle brush, dip it into dark brown and then dab it onto newspaper until no more color comes off (yep, it's a total waste of paint, but it must be done as this is the "dry" part to dry brushing).

Once the tip of the brush is dry, I lightly drag the brush over the light brown base in one direction. How much paint comes off depends on how much pressure is applied, so this is repeated until I have a suitable texture to work with. Now, wood isn't perfect, it's organic with knots, curves and discolorations. So with a smaller brush, I paint the dark brown on random areas using small circular strokes.

It's important to let the paint dry and cure. Acrylics take a long time to cure, but generally one day should be sufficient here, as I am just going to sand some of the surface texture down. With 600 grit sandpaper, the surface is very lightly dry sanded - I only want to knock down the dry brush texture, not touch the base coat. There are only two colors used in this grain, but it looks much richer because the sanding will create a gradient of colors in between. After sanding, the surface has a low-contrast, whitish look to it with the sanding residue. All the residue is wiped off with a dry cloth and then a clear coat of Future is applied making the grain pop out as in the picture above.

Finally, the edges are sprayed with black to get the burned look on the sides.


A dry brush grain is applied to the neck as well, but lighter browns are used to get a different wood for the back of the neck. This is done exactly the same as with the body.


The fretboard is masked and dry brushed as well, using darker browns. This gives a nice texture to the fretboard, even though you'll never see it unless you are examining it up close. The silver frets are painted last.

The Italia logo is done in photoshop and printed on white ceramic coated paper - I used this because I had it lying around and the ceramic white is smooth with no paper grain. You can buy decal paper, which probably works better, but I didn't. This is then cut to shape and sealed onto the headstock by coating it with Future.


The other parts are all painted (black and silver) and assembled. The tuning posts and tuners are pinned all the way through the headstock, which gives the posts some extra strength so they won't be as fragile (you will be dropping this guitar quite often while trying to position it in Haruhi's hands *grumble*). Brass strings are then wound around the tuning posts for some added realism (finished guitar in the Haruhi post).

( ... read more » )

[wip] Haruhi Stockings

I've been asked a few times about how I did the Haruhi stockings, so I thought I would post about it.


Surfing the web for advice on how to do these stockings will show a lot of different methods, requiring various levels of skill (sewing, carving, completely breaking off the shoe and reattaching it, etc). Since this was the first kit I was building, none of those would do, as I have none of those skills. Also, some of the photos weren't very inspiring since I could still see ugly seam lines, pinched fabric at joints, uneven stretching, fabric lift on curves and even tears and runs. I wanted Haruhi to have better stockings (and this sculpt deserves better stockings), so I thought it over to come up with a way that would look good using only the skills I had.

First, since the shoes are molded onto the legs, there is a clear problem on how to make the stocking blend into the shoes. It seemed to me whatever solution to make this look right would also apply to the seam lines. Those lines are also molded into the legs, so there is no doubt where they should be. All that's needed is some way to keep the fabric in shape when hardened, allowing you to make the appropriate clean cuts. Ah, it's kind of like paper mache. The nylon fabric is porous and will absorb a liquid, but since the layer underneath will already be painted, it's important to not ruin the paint. Also, since you want the painted layer to show through, it's important that the liquid be absolutely clear. This is the same as sealing a layer of paint, but the layer now is fabric.

The solution: Johnson's Future Floor Wax. It's a liquid acrylic that can be brushed on, cures hard and encases the nylon in acrylic which can be easily cut with an Xacto knife.

To start, I completely painted the leg, with all the shading, as if it were to be displayed without stockings. Once you put on the stockings, you can't change the paint underneath, so this paint job has to be as perfect as possible before continuing. The molded seam on the back of the leg is painted black, then the whole thing is sprayed with a few layers of Future to protect the paint.

seam line is painted black

I used masking tape on the seam line, but if your hand is steady, it's not necessary at all. Now, here's where this process becomes lengthy. Future takes 24-48 hours to cure and you have to let it cure. I allowed for 24 hours after applying Future, so go work on other parts, play a game or watch TV and come back to it the next day.

The nylon comes in a sheet of fabric, so I cut enough to fully wrap around the part with about 1/2" edges. Real stockings are elastic and form fitting, so loose fabric won't do. I need a way to hold the fabric stretched in place before I can continue. Easily done with fingers, but I'm not willing hold the fabric in place for 24 hours. A perfect use for strong hobby (NeFdB) magnets. I got these tiny ones from Amazing Magnets, and they are easily applied with metal tweezers.

Open the tweezers, stick one magnet on each tip, position the magnets on each side of the fabric and close the tweezers to deposit them in place. Then just slide the tweezers off. You can nudge the magnets with your thumb and finger to apply the proper amount of tension (red lines in the photo) on the fabric - note that the fabric is slightly warped around each magnet - this doesn't matter, what matters is what it looks like at the seam line.

I put on enough magnets to stretch the entire length of the leg (took about 2 minutes total) making sure the polarity of each pair is the same - these magnets are super strong and with them so close to each other, if the same sides are not repelling, they will pull the fabric into one big blob (don't ask how I know). Also, note that the magnets are all placed on one side of the seam - in order to get the seam cut perfectly, I'm going to work on this in two parts. What's important is that the fabric touches the seam on the top side, because that's the side I'm going to seal the Future on first.

brush away from the seam, first half

Here's the last chance to make sure everything is right. I examine the part from all sides to make sure the nylon is oriented perfectly and stretched properly all around (look at the vertical and horizontal loop lines in the nylon). Think of brushing on the Future as locking it in place, it will harden and hold whatever shape it looks like now. I used a 1/2" stiff bristle brush to apply a wet coat of Future starting at the seam and brushing away from it toward the front, stopping there. This is repeated down the length of the leg. The same thing applies at the shoe, start at the seam and brush away.

As said earlier, I am doing this in two parts, so at this point the Future has been applied to only half of the leg. I set this aside and let it cure for 24 hours.

(one day later)

The nylon fabric has absorbed the Future and is now very hard whereever it was applied. It's now safe to take off all the magnets and I soak them in a jar with some windex (if any of the Future got on them, I don't want them sticking to each other). Taking an Xacto knife with a new blade, I cut each strand of nylon along the seam line while tugging on the loose end. The nylon is essentially hard acrylic now and will snap when cut, a light tug and the loose edge comes away cleanly. I forgot to take a picture of this, but you can see it in the picture below - there is a nice clean edge on the top half of the seam line. This is why I chose to do this in two parts, so each side can get a perfect edge on the seam.

Next pull the other half of the fabric around the seam. As before, I need to apply some tension to the fabric and hold it in place - this time magnets won't work, but masking tape will. Also as before, I make sure I am happy with the final placement of the fabric before applying the Future. Then it is a repeat of the previous step, starting at the seam and brush toward the front.

brush away from the seam, second half

At this point, the rest of the part will have been sealed with Future and I leave it to cure again for 24 hours.

(one day later)

The nylon has absorbed the acrylic and turned hard, it's safe to remove the tape. What I have is a fully cured part with a loose edge of fabric.

loose edge needs to be cut

And again, cut each nylon strand on the seam and tug the loose edge. Here's what it looks like now.

also cut around the shoe

I then cut around the shoe in exactly the same way. When cutting around the shoe, it is safer to error on the side of leaving too much fabric on, as it is easier to remove excess fabric than to add it back. I left painting of the shoe to the very end, so once I am happy with the seam at the shoe, the leg is masked off and the shoe is finally painted.

Here is the test fit of the finished legs onto the torso. Notice that the legs are very shiny - this is the Future layer as it is very glossy. To cut down the gloss, the legs are sprayed with a flat matte finish before final assembly (see the finished figure in the Haruhi post).

test fit with stockings

And there you have it, a method of applying the stockings that requires only brushing and xacto knife skills that results in clean and straight seams. As they are essentially hard acrylic now, these stockings can be handled without concern - they won't shift, tear or run. Total amount of real work was about 20-30 minutes, with a few days of waiting for parts to cure. As the saying goes, "good things come to those who wait". Take your time and have fun!

( ... read more » )

Gallery Links

Pinky Rin Archer Schpeltor Mikuru Asahina Angel Rebirth Moyashimon Satsuki Ikaruga Yuki Nagato Pinky:St Saber Mina Tsukishiro Haruhi Suzumiya

About This Blog

My photo
Sunnyvale, California, United States

A blog of my hobbies and a place to show progress and finished models. Galleries are embedded as slideshows to reduce page load time, but you can open any album by clicking on its label.

dannychoo.com

figure.fm

Akiba-Station

Through the Looking Glass