
I picked up a bunch of these wood plaques at Michaels when I went to look for something suitable as a base for Satsuki. These were $1 each, roughly 5"x7" in varying shapes, and are made up of 7 wood veneers sandwiched together with beveled edges. It worked great painted, leaving one veneer of wood showing, though the rough surface is still visible after painting. I think something like gesso, then sanded down might give an absolutely smooth surface to get rid of the grain under paint. I also looked at solid wood boards, but it was impossible to find one that wasn't warped. These veneered plaques were cheaper and perfectly flat. I'm going to use the oval one to make a proper base for Yuki.
I also picked up a block of Sculpey III after watching that Plamo scratchbuild video. This stuff is a bit strange to work with though. It starts out hard and crumbly, but after kneading it for a while, it becomes soft and slightly sticky. I played around with a small ball of it and came up with this after 10 minutes, something similar to a Pinky head.
At this point, it was really too soft to continue working with. Any pressure would deform it, so I let it rest hoping it would harden again, which it did overnight. Michaels has one of their rare 25% off entire purchase coupons tomorrow, so I think I'll grab some more stuff.
Saturday, May 31, 2008
Hobby Supplies
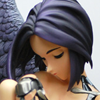
[figure] Satsuki Ikaruga

Here is the finished figure of Satsuki Ikaruga, from the game The Spirit of Eternity Sword 2. If you're interested in how this was made, you can follow my work in progress here.
This is my fifth completed resin kit and the first with cast-off parts. There's very little glue used in this figure and planning out how to build it, while still being able to disassemble it, was challenging. The scale is listed as 1/6, but it's closer to 1/8 - she is actually smaller than Mina Tsukishiro.
I've split the photos into two sets: a normal set (top/SFW) and a cast-off set (bottom/NSFW).
Medium: airbrushed acrylics on resin. Scale: 1/8 @ 14cm. 14 photos in this set (SFW).
WARNING: This cast-off set has artistic nudity and may not be appropriate for some viewers. 10 photos in this set (NSFW).
Thursday, May 29, 2008
[wip] Satsuki Ikaruga
[ 04.11.08 ]
I picked up this Cerberus Project kit of Satsuki Ikaruga from the video game, Spirit of Eternity Sword 2. Here's a picture of her from the game:
I'm not sure why though since I haven't played the game, but I thought the character design was nice and the kit pose was dynamic. It turns out it has a lot of "cast-off" parts, so it will be a challenge to assemble while keeping the parts (ok, clothing) *ahem* removeable. I suspect that most of the pinning and gluing I've learned to do won't apply here, so I'm going to think through how it should be assembled before starting.
This picture is what I'll use for color reference. The photos or box pictures on the kits, while very nicely built, sometimes have the wrong colors. I like getting images from the original source material and try to match those colors when mixing paint. It's hard to get the exact colors, but I'm satisfied if it comes close.
Not sure if I will keep up with the ongoing WIP like I did with Yuki, since it takes a bit of time - and honestly, I don't think anyone actually followed it... ^^;; I will probably just keep this post around and do a postmortem update like the Haruhi wips, which is a lot easier and probably flows better. That said, if there's any build step that anyone wants covered, post a comment and I will try to detail it.[ 04.13.08 ]
Found more reference pictures from the Xuse site:
There was amazingly little flash to remove and almost no cleanup needed, so the parts are currently sitting in a Simple Green and water bath. This is left to sit for a day and then I will strain the bath into a jar and it can be re-used for another kit.
I played with fitting some of the pieces yesterday and this is sort of a 3D puzzle as the cast-off parts almost lock together when assembled in the right order. I think the load bearing parts can be long pinned, only glued to one side, so they can be removable and still have support.
The rest of it looks fairly simple, but there are lots of detail parts that will need careful masking and hand painting. The shirt in particular as all the detail is molded onto the surface. That will probably be where the most time goes.[ 04.17.08 ]
Finally finished pinning this kit, which was harder than I thought it would be. Needed to figure out what parts are load bearing and how to attach the cast offs without it falling apart. Here's the fully pinned, dry-fitted figure (no glue at all):
And now all the "armor" removed:
Some joints need puttying and sanding work, which will be next. Then prepare it all for painting, which should hopefully start next week.[ 04.27.08 ]
There wasn't much progress on Satsuki last weekend due to not being home for most of it, but I have managed to finish puttying and sanding over the week. I broke the strap on the back of the shirt while trying to clean it up as it wasn't cast well and decided to just take the whole thing off and replace it with fishing line. That allowed easy access to sanding down the back and the line looks much better than the surface molded strap. The trick is getting it to join the strap on the other parts, but I think it will be fine once painted.
I also decided to use hobby magnets to hold one corner of the skirt together while the other corners are simply pinned. The two pieces hold together pretty well and can still be easily taken apart.
Cleaned the airbrush to start painting a base white. I have the grey primer in a rattlecan, but the stuff stinks and I hate using it. I have switched to using Delta Sealer with paint mixed in to prime the base coat - my last two kits have been primed this way and it works really well. It does clog your airbrush, so if you have a fear of taking your airbrush apart after, I would not recommend using this method. You don't want this stuff drying up inside.[ 04.29.08 ]
I painted the eyes, which I build up in layers. I like doing them first so I don't have to worry about the rest of the part if I need to make any corrections. Here's what it looks like as each layer goes on.
The eyes need to have a point of focus - she's looking up and to her left, which is what I wanted and I'm happy with this. I'll just cut masks to fit over the eyes and then paint the rest of the part. The outer lashes will then get refined after the rest of the face is painted.[ 05.06.08 ]
So much white on this kit and I always seem to transfer other paint onto it.. *sigh* Painted the hair and base coated the blue, which is actually less saturated than in the photo. Still needs shading, after which I can remove the masks and see if any of it seeped onto the white. *fingers crossed*
Since lots of parts need masking, it's taking longer than I wanted and kind of losing motivation. That and I finally picked up BioShock on sale and spent most of the weekend playing it instead. ^^;;;[ 05.11.08 ]
Unwrapped all the masks and there was some minor bleeding underneath, which was easily cleaned up using my favorite tool - a wood toothpick. You can sharpen a toothpick to a very fine point, dip it in water and use it to scrape off excess paint, but only when the paint is dry.
I also did some shading of the white parts using blue and black. I like how the shading on the skirt came out, but not really liking the sleeves. I'll try fixing it, but I'm guessing I'll have to strip and repaint the sleeves. The metallic parts are painted a base black prior to spraying the metallics.
My air compressor died this weekend, so this project will be on hold until I get a replacement.[ 05.18.08 ]
I did some hand brush detail work on the shirt while shopping for a new compressor.
There's some clean up to do still and the silver part needs to be sprayed over gloss black. You can see I've started painting the black edge by hand, which is a trick for those of us who are masking-challenged.
Masking is a must for airbrushing because there's little control, but it's hard to get the masks perfect on complex parts. So, to get nice seams, you can hand paint the edges first in a slighly darker color, then put on your mask as normal. This way, even if you don't get the mask perfect, it covers the painted edges so when you remove the mask, the part will look airbrushed with very clean lines.[ 05.20.08 ]
I noticed Paasche dropped their old D500 compressor and the new D500 looks to be a clone of the WhisperAire/TC-20/CentralPneumatics compressor. I didn't want to wait any longer, so just went and picked up the Central Pneumatics at Harbor Freight this weekend. Not sure if I'm going to keep it yet, but so far I mostly like it though the moisture trap is mounted too close to the compressor and isn't completely effective. It isn't silent, but *much* quieter than the "Quiet Air" - it's only slightly louder than the fan in my spray booth and, most importantly, it doesn't give me a heart attack when it turns on, something I never got used to with the tank compressor.
Here's the new flesh tone sprayed along with some browns. I like the color though it could be just a tad lighter. Next is masking for the metallics, so the plan now is masking, black, metallics, clean brush, white, clear coat, matte finish. That should take care of all the painted parts and then final assembly. Memorial weekend is coming up, so with luck this might be finished next week.[ 05.23.08 ]
Finished spraying the blacks and metallics, plus added a clear coat.
In retrospect, I should have painted the white skirt first as I'm having trouble masking the blue lines to paint the white and keep thinking it would have been far easier the other way around. I thought there would be less to mask this way, but the masks are much harder to apply. Have to remember this for next time.[ 05.26.08 ]
I got all the parts detailed with the appropriate finishes applied using matte, satin and gloss.
I've started the assembly, but had a containment failure with glue that oozed out the wrong way. Quickly pulled the parts, but the CA glue had already damaged the paint on one leg and ended up sanding it down and repainting the area. I'm using Amazing Goop with CA glue to hold while the Goop sets. Goop doesn't bond with acrylic - if you get some on a part, just let it dry and it'll rub right off. But the CA bonds instantly and will lift off the paint. :(
I forgot I needed a base for this one and got a bunch of $1 wooden plaques at Michaels. This is a test assembly so I could figure out where to drill to mount the foot. As this is my first base, I'm not sure how to paint it. I figure I need to sand it down and prep the wood for paint with a sealer. Almost done, but the white skirt parts are still giving me a headache. *sigh*[ 05.28.08 ]
I sprayed the base using the Eclipse which took about 3 layers for a deep black. It probably would have needed 10 layers if I had tried using the G44. I left one side with wood and put a couple coats of acrylic over it. I like these plaques since they are beveled on both sides so they are actually reversible bases. If I flip it over I get a fully black base, it's kinda cool.
Here's her plasma sword completed. I couldn't find any good references for what it should look like, so I took some liberties in painting it. Just waiting for a final finish on the skirt and she should be done.
[ complete ]
The finished photos are in the gallery here. ( ... read more » )
Friday, May 23, 2008
Scratchbuild Video
I've been watching this episode of Plamo Tsukurou CUSTOM Scratchbuild SP-6 on YouTube. It's not subtitled, but you can get the idea just from watching the video, which shows the entire creative process from original drawings to sculpting to completing a figure kit. Very cool episode, makes me want to try sculpting one from scratch:
Links to the rest of the parts:
Part 2
Part 3
Part 4
Part 5
Part 6
Part 7
Part 8
Part 9
The figure being crafted in the video is Aile (Air, Airu), an original character design by Niθ and the resin kit produced by Kotobukiya. Only available at WF, as far as I can tell, but a PVC figure is rumored for later this year.
( ... read more » )
Sunday, May 18, 2008
Mixing Paint
I mixed a batch of flesh colored paint when I first started building kits and it's lasted through 4 kits. There's still some left, but it's dry and clumpy, so it's time to toss and mix another batch since I'll be needing it soon. Except for specialty colors which can't be mixed, I usually just buy paint in basic "pure" colors (W/K/Y/R/G/B) and mix my own. Here's a flesh tone using just basic colors:
The ratio is a "ballpark" starter that will get you something close depending on the actual paint you use (not all paints use the same pigments or density!). It will be different for everyone, but this is what works for my paint and you must adjust it yourself.
A common rule for mixing paint is that dark colors and denser pigments will overpower. Start with the lightest color in your mix, in this case white. Then add the next lightest color (yellow) and so on. When adding darker/denser colors (reds, blues, blacks), don't add the whole thing at once. Add them in small amounts (even a drop at a time) until fully mixed and then add more only if necessary.
Another rule for mixing paint is that paint dries darker than when wet. Before darkening your mixture, test it out first on a piece of scrap. You may find that it darkens to the color you want when it dries. If you mix a lot of paints into jars, a tip is to the paint a brush stroke of the mixture on the cap. When you come back to it later, you'll know exactly what color is in the jar when dry.
Unless you're a machine, you'll never mix the same color twice. Make sure you mix more than you actually need to use in case you need to repaint or touch up. It's just paint and if you learn to mix with basic colors, it's inexpensive too.
Sunday, May 11, 2008
Out of air
My air compressor died this weekend. It was a Campbell Hausfeld QuietAir 2 gallon compressor (FP2040) that wasn't very quiet to begin with. The pump started making even louder knocking noises about a week ago and taking longer and longer to fill the tank. This morning the tank was empty and wouldn't fill at all.
I disconnected the hose and closed all the valves to see if it would just fill the tank on its own. No needle movement on the guage, not even 1 psi. I took off the compression fitting to the pump and checked the air coming out of the pump. No pressure at all.
So, off came the pump head to take a peek inside. The piston uses a cheap plastic outer sleeve that does not center and wasn't sealing against the cylinder. The cylinder lifts straight out and there were large clumps of metallic dust under the piston, which had been grinding away against it. In other words, it's a piece of junk.
I have mixed feelings about this. On one hand, I'm mad because I bought this compressor instead of some cheaper ones as it was supposed to be quiet and my experience with it hasn't been good. It wasn't quiet (louder than a vacuum, but tolerable since it wasn't on all the time) and it turned out to be junk. I didn't expect it to last forever, but if I average two hours of duty time per kit, the total duty time of the pump was under 10 hours. Replacing the pump will cost almost as much as a new compressor and I don't think it's worth it.
On the other hand, I'm glad this is broken now so I can get a quieter compressor. The problem is, a lot of people recommended the QuietAir, so one person's "quiet" isn't the same as another. I'd like to find something 50db or less, so I can expand my spraying time into late night. Right now I can't spray after 10pm due to local noise ordinance. Though, hardly anyone lists the db rating for compressors - instead using labels like "quiet", but quiet compared to what?


 Subscribe in a reader