

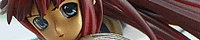
This is the SOL Models kit of Angel Rebirth from GUNNM/Battle Angel Alita. If you're interested in how this was made, you can follow my work in progress here.
This is resin kit number 6 for me and the largest one I've tackled so far. The body contains multiple parts that are hard to make seamless given how the parts must be assembled. I don't think I want to build another kit with so much skin.. ^^;; I took a long break in between building her, but picking up the airbrush again was pretty simple. I'm glad she's finally done.
Medium: airbrushed acrylics on resin. Scale: 1/6 @ 23cm. 20 photos in this set.
Sunday, January 25, 2009
[figure] Angel Rebirth
Saturday, January 24, 2009
[wip] Angel Rebirth
[ 06.08.08 ]
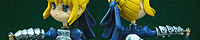
The next kit on my workbench is this Sol Models figure of Gally from GUNNM (Battle Angel Alita). She doesn't actually have wings in the manga/anime, so this is a conceptual sculpt and there are very few references - just the box picture and this illustration:
I've started removing the flash and marking the areas that need extra clean-up. Despite being an original cast, there are lots of seam lines throughout, including some of the very detailed areas. On close inspection, I count 11 pieces of mould material stuck in the recesses that need to be picked out - that can't be good for the subsequent casts using this mould. It's going to be a lot of work, not as bad as the Mina cast, but it took me a month to clean that kit up and this one has more surface area. She's the largest kit I've worked on so far. At a real 1/6 scale, her face (3.5cm) easily dwarfs Satsuki's (2cm).
[ 06.19.08 ]
I'm not really sure what to make of this kit. I spent some time picking out the stuck mold material and there was a lot more than I originally thought, including some fairly large chunks:
The detail is amazing when it's not near a seam and I expect the seams, but the stuck mold.. I'm afraid to think what the next pull would have been like. Maybe I should be happy that I didn't get the next pull. There's already over 20 pieces I've picked out with a dental pick - some so deep, part of the resin broke trying to get them out.[ 07.08.08 ]
There hasn't been much progress on this kit, partly due to the Diablo3 trailer causing some nostalgia and a lot of us installed Diablo2:LOD and replayed it. But the other reason is the parts fit is giving me a headache. Here's the two halves of the hair, which don't align at all.
On the top, the red on the left part is how much higher it is versus the right, so it needed to be ground down. You can see how thin the resin is on the right part, it's nearly transparent in the middle. This area needed filling in with putty. On the the bottom, the two halves are almost aligned, but still needs more putty. *sigh*
The body is mostly pinned and final assembly of this is going to be tricky. Due to the parts breakdown, the mechanical arm will have to be fully painted and attached first. Then the human arm attached and puttied to the body for the joint to be seamless, then painted. I'm waiting to pin the head first before trying to align the wings so they don't end up at a bad angle. And that's the just pinning so far. Notice all the red marks that still need sanding.[ 07.20.08 ]

Finally, here's the pinned kit. The egg shells were a pain as while it is supposed to be cracked, none of the parts fit all that well and needed joining with putty. Some parts are too thin to be pinned and are simply held together by epoxy putty, which should be strong enough since these aren't bearing any load.
She's heavy though and it all balances on the "cord" connecting her to the base at an angle. That area has me worried, as the one joint is bearing the entire load and there's just one pin there. I've been using soft brass pins, but I think this area needs something harder as the brass is bending under the load. A second pin might do it, but there's not a lot of space. While not many parts, this is by far the most complicated kit I have in terms of detail and I'm struggling with planning out how to paint this. Next though, is finally sanding off all those red marks and giving her a bath.[ 08.02.08 ]
When I started this kit, other than being large at 1/6 scale, I thought it would be a breeze to put together - especially after finishing Satsuki which I thought was the hardest so far. Boy, was I wrong.
The feathered wing comes in two halves and again, they don't quite fit together. I ended up pinning this with 3 pins and a lot of epoxy putty. The wing tip didn't meet at all, so it's been filled in and will need some reconstructive sculpting to blend it together.
The legs have been carefully sanded down. I think the biggest difficulty with this kit is you can't just go all out and sand away because there is a lot of surface texture everywhere that would be lost with aggressive sanding. Consider all the feather detail and the tiny mechanical parts - there's actually corrugated textures on the hoses and weave textures on the metal cables. This means I need to sand down every tiny surface individually while avoiding the textured ones. Definitely not a starter kit and maybe even more advanced than I can handle right now, but I'm going keep at it.
You can still see small red marks showing in the flat areas - these are actually small indents and pinholes in the surface which will need to be drilled out, filled with putty and then sanded flush. It's been taking so long that I miss my airbrush though. I've only been attempting one kit at a time so far, but I'm considering starting something simpler so I can get back to painting.[ 08.13.08 ]
It's been a while since I posted an update on this kit, but it's still in the very boring and tedious surface cleaning stage. The divots and bad surfaces on the body parts have been drilled out, puttied and wet sanded flat, like so:
Yay, no red marks left on the body! I've started cleaning up the wings and have taken a hack saw to clear out the larger chunks of resin in between the big feathers (marked red).
You can see where I've started making the cuts on the center one. I've seen some photos of finished kits where you can see these chunks have been left in and simply painted, but you have to be looking for them or they're not so noticeable. I was thinking of doing the same, but I didn't think I would be happy with it, so the saw came out.
You might be able to see where the mold line passes through, just above the cut. The feathering doesn't align across the seam, so the short side needs to get sanded down and the feathering redrawn in putty. :P But on the bright side, there's just the egg and the base left to clean up.[ 08.23.08 ]
Nearly all of the cleanup is done and I've decided to start tackling the more difficult parts to paint. Primarily, I have no idea how to paint the mechanical limbs, but I have an idea what I want them to look like in the end. Looking at how others have done this kit, the mechanical parts range from single solid colors (metal/black) to varying colors of off-flesh parts. What I'm looking for is the metallic framework to show through with flesh-colored veneers. 
Not knowing how to get this look, I've decided to experiment on the different parts. For the leg, I hand painted the recessed areas black as a base for the metallic colors and then masked it off. In theory, everywhere that's exposed will get a flesh tone on the surface only. It's turning out to be an awful lot of work though..
For the arm, the whole thing is sprayed with a flesh tone. Masking on top of this will produce the veneers, while the metallics get worked on. In theory, the patches of skin-tone will be protected by the masks. It seems easier, but which will turn out better? If neither do, they might just get stripped and the whole thing started over. Since I haven't painted parts like these before, it's challenging and I'm taking this opportunity to learn from it.[ 08.31.08 ]
After unmasking the leg, it didn't turn out bad, but not as clean as I would have liked. I decided to apply masks to the skin tone like I was going to do with the arm, so it looks like that method's the winner.
Masks applied over the skin tone veneers leaving the metallic areas exposed, then the whole thing gets sprayed with a black base and metallics on top.
Spraying on top of black lets you get some nice shading on the metallics, the recessed areas stay mostly black and brightens as the area gets exposed. Since the spray needs line of sight, spraying from the angle of light creates some nice effects. You can already see some depth to the metal parts and once dry, running a wet sharp toothpick along the seams will expose more of the black base and it should look even better.
I just added a drop of color to the remaining silver in the cup and sprayed some metallic tones on the fingers, toes and joints. I think this will make it more interesting as all the metals aren't just one color. Since I took the trouble to put on all those masks, I'm going to leave them on while painting the tiny details by hand. Then the masks come off and we can finally see what the result will look like. ^^;;[ 09.01.08 ]
Here are the details painted and the masks removed. There's some edges and lines where the paint seeped under that need cleaning up still. Overall, I'm pretty happy with the results so far.
The masking came out close to what I had wanted and with the tiny details painted, it all pops out. Two of the panels on the forearm reacted with the masking tape and the surface is really bad. I probably didn't let it cure long enough and it will need to get sanded down and repainted. Since I have to paint the body the same way, I will just repaint it at the same time.[ 09.09.08 ]
I've been working on the main body and it's been giving me some headaches. I wanted to assemble the parts and smooth the seams before painting to get a uniform piece, but the glue that I've been using for all the other kits just won't stick to this particular resin. It's bizarre, so I've resorted to using epoxy putty to attach the parts:
To get a better bond, the parts have extra holes drilled into them so the putty has somewhere to grip into (like fillings) and the entire outer seams have been carved out with a dremel so the putty can be sanded flush. You can see this in the arm joint, which can't be attached yet, but I wanted to do the carving now so it will just need putty and sanding once the pieces are assembled.
I also broke off the hydraulic at the waist in one of my attempts to glue on the leg. And again, I couldn't get glue to stick to fix the part, so I just replaced it with a brass rod and putty. This part goes into the mechanical leg, so only the surface will be visible and it will look normal once painted.
Fixing bad casting in the base cord as well - a lot of the cables that wind around it are full of bubbles or missing segments (blue). The worst of these have been cut out and replaced with fishing line (red). Once painted, they should also blend in normally.
Next will be wet sanding the body so the seams are smooth and then painting the flesh tone and more mechanical parts.[ 11.12.08 ]
I finally got around to spraying on the base coat of paint for the main body. It was easy to tell, once the first coat was on, that there were more problems that needed fixing. I didn't think the joint seams were smooth enough, so there's been some more filling and sanding as you can see here. 
Some if it is at such odd angles that it's hard to get any sandpaper onto it. I ran out of flesh tone as this kit is much larger than the others and way more surface area to cover. Once I mix more, it'll be another coat and repeat if there's still problems. ^^;;[ 01.05.09 ]
Happy New Year! It's been quite a while since I've done any work on kits due to other circumstances, but I had some time over the holidays to make some progress. I started with another jar of flesh tone paint and mixed a slightly lighter tone for the main body, which should help differentiate the mechanical parts more. I also sprayed a dark purple (almost black) base color for the hair and wings:
The hair and wings will get a lighter purple sprayed over and I did it in this order since there are so many recessed areas in these parts. The airbrush spray covers with line of sight, so it's hard to get into areas that are deep at angles. Since those areas are already painted dark, they should stay dark when sprayed over.
That's the same idea with the mechanical parts. I started with hand painting the deep areas in black using a brush. Then all the flesh areas get masked with tape and sprayed over with black to get nice coverage.
A base coat of metallic silver is then sprayed and then hand detailed with a thin mix of silver and colors to make new metallic tones. Next will be masking off the mechanical areas so I can spray the left breast with a metallic to fade it in with the flesh. This is it so far.
The mechanical "feathers" are sprayed as well, with a mix of blue, purple and silver. I saw a picture of her in a junk yard with her wings in a dark purple and really like the color scheme, so am painting her this way rather than the white/brown in the box photo. Her hair has a blue/purple tone in the anime as well, so dark purple scheme fits really well for the wings. The feather wing broke at the epoxy joint and is getting fixed, but will get painted the same way.[ 01.11.09 ]
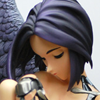
I removed the masks and cleaned up a few spots where paint had seeped under. It's always a risk when hand painting wet paint over masks, but I hadn't worked on it in so long I forgot about that. ^^;; The face detail and hair are done and just waiting to put a clear coat on these parts before assembly.
This is how the back of the mechanical side turned out, which after assembly will probably never be seen again as most of this detail will get obscured by the eggshell. :P
And here is some color on the wings, which still need more work. I added the light blue to the feather wing to give more color, but it's now off balance with the mechanical wing. I need to find some way to add light blue to the mechanical wing and some gold to the feather wing to help blend the two parts together.
[ 01.20.09 ]
Here's the extra work on the wings. I decided to use a light blue metallic on the edge of both wings to help blend the two parts together. It's hard to see here, but the shafts of the larger feathers also have a slight gold tone to match the metallic framework. I'm pretty happy with it now and they look very nice together.
While spraying the metallics, I started painting the base and the umbilical. The graphite tone is black mixed into silver and the copper tone is red mixed into gold. I'm going to try a black wash on them later to get a more grungy look. I've also attached the limbs to the main body and started the hard part of trying to make the right arm seamless.
The arm joint gets filled with putty, which is sanded down when cured (above). A base layer of paint is brushed on and again sanded down when cured (left). Then a final layer of paint is sprayed with some shading to blend with the existing painted parts (right). It looks ok so far, but I had a hard time keeping the plastic wrap from wanting to touch the wet paint. So there's like two areas that will need some touch up when the paint is dry, but I think it can be carefully done with all the masks removed.
What's left is to finish the egg shell and umbilical, then assembling it all together. Barring any disasters, I think it should be done this weekend. If you've followed this far, I'm so sorry for this ending up being such a long WIP.. ^^;;
[ 01.24.09 ]
I finished painting the shell in a white/grey with a slight purple tint. I think it goes well with the wings. To give it some texture, the exterior was lightly sprayed with a spatter of purple - this was done by turning down the air pressure below where the airbrush would finely atomize the paint. It gives the exterior a grainy speckled look.

The umbilical cable is also done, though I forgot to turn back up the air pressure and the black I was going to simply shade with, ended up spattering as well. After swearing for a minute, I went with the flow and kept painting with low pressure. It ended up looking like soot this way, which actually looks pretty cool so it turned out to be a good mistake.
The shell is epoxied to the base with 3 pins - in the center and where it joins the two pipes. I added a second brass pin to the bottom of the cord since it will be holding a lot of weight, but I've decided not to glue it to the base. It'll be glued to the main body and I'll leave the whole thing in 4 parts (base, body+cord and two wings) so it can be disassembled if necessary. I just need to wait for these parts to dry before assembling (probably tomorrow).
And that's pretty much it, so this should be the last update in this WIP!
[ complete ]
The finished photos are in the gallery here.
( ... read more » )


 Subscribe in a reader