[ 05.14.09 ]
Kaien was looking for someone to build this kit she got for her birthday and as I have all the tools, I offered to build it for her. For me, it'll be interesting and fun to build a non-figure kit and as it is still resin, it should be mostly the same process. The kit is the FSS Water Dragon "Schpeltor" from Work Shop Cast.

Inside the box are the familiar bags of resin parts and an assembly sheet - these things are very simple diagrams, so they take some time to figure out how the pieces all fit together, and there are a LOT of pieces in this kit. What's new for me are the white metal parts and the decal sheet.
I don't know why some parts were cast in metal instead of resin as they aren't more detailed than resin. Some of them are thin and long, so perhaps the metal is less prone to warping, but is still slightly piable. The sword hook is probably stronger using metal, so less likely to break. If anybody knows the real reason for metal parts in a resin kit, please let me know.

I've just started removing the parts from the gates, sorting them into their groups and examining them in the process. There are extra hands for different poses of the sword, as well as parts to build either the original Water Dragon or the modified Kaien version. We'll be building the latter verion, naturally. :)

Most of the parts are clean cast, but there are some problem areas. Some of the resin was not mixed properly before casting, so a few of the parts have uncured blobs in them. They have a consistency like dried syrup when poking at it with a knife. There are also the usual surface pinholes, seam lines and a few paper thin areas that need cleaning up and puttying. Save that for later while I look for some reference material.
[ 05.25.09 ]
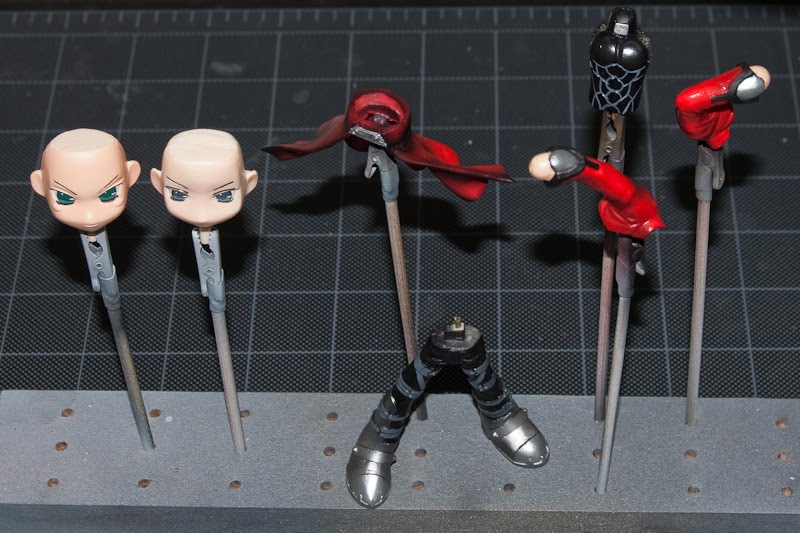
I did some basic flash removal so the parts could be pinned together. There are lots of parts, about 73 used in this version and a half-dozen more for the other version. Here's the dry fitted kit, held together with just pins and some tape on the metal parts (the metal parts are pinned as well, but they won't hold without glue).

The kit has some sort of "free pose" so the joints aren't snug like other kits. They can be posed and then pinned into the pose, but it's sort of a pain to fit together, making it difficult to tell if it's done right or wrong until the rest of the kit is assembled and balanced.

Now to break it all down again and start cleaning up the parts. A few seams need to be puttied and a few parts straightened. But I think the most time is going to be filling in all the pinholes, more than I've seen in any kit so far.. *sigh*
[ 07.01.10 ]
Wow, it's been over a year since the last update on this project and yes, it's still being worked on.. ^^;;
I took a year off to focus on other activities, some much needed socializing, and took a trip to Japan - maybe I'll post some pictures. I finished relocating all the hobby stuff to the basement, built a new spray booth area and started off painting the difficult white. It has some micro pearl powder in it to give it a metallic look.

And then the gray, with a black wash on the panel lines. The lines are a little messy right now, but a Q-tip with some solvent will clean it up easily.

Then silver and gold on all the leg parts, which needed a lot of masking.

The decals are applied on the legs, and then brushed with decal setter to mold them to the part. The decals were larger than the part and needed to be cut up to fit properly as shown in the instructions - yes, it was designed that way. After careful aligning, they came out pretty nice. You can't see the seams, which I think is pretty good for a first try at decals.

Up next will be painting the skirt, while finish detailing the torso and assembling the main body. We'll see if that takes me another year. ;)
[ 07.08.10 ]
The legs are assembled, but the hip and ankle joints are not yet glued so they can be adjusted for stance when the full kit is done. I'm thinking about making it disassemble at the torso, so it can be packed easier for moving.

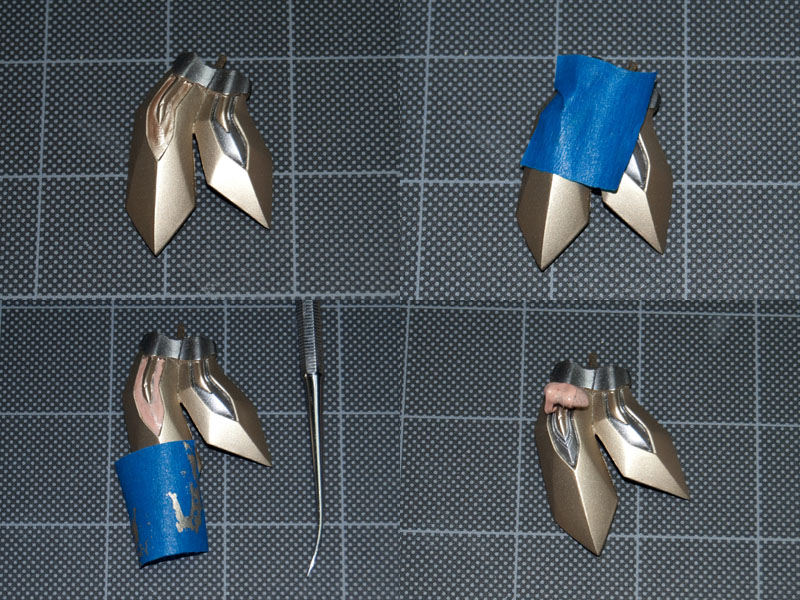
The skirt and main torso parts are painted with their base colors and then some silver painted. Gold will go on top of the remaining black base coat. I wanted to do a two-tone on the detail part of the shoulder blades, so that area has been painted with silver and then masked for the gold coat.

I tried using tape for masking but the irregular shape and curve made it extremely difficult. I ended up filling the area with silly putty as a masking agent and it turned out to be simple. The putty is very stretchy and only slightly tacky, so I just used a pick to push it around where I wanted to mask.

Sprayed the gold layer and let it cure. At first, I tried picking off the mask, but it got a little messy with the paint layer on top - it crumbles and gets everywhere. The paint doesn't adhere well to the silly putty, so I lightly smoothed some tape over the putty and it pulls off the paint easily. Then take a ball of putty and roll it over the mask and it lifts right off. Since there's relatively little paint remaining on the mask, the ball of putty could probably be reused a few times. But silly putty is pretty cheap anyway and a tiny piece can stretch to a large area.

Since it worked so well, I used the same masking technique to the inside panels of the skirt parts. The masks are very clean with almost no post clean up that's usually needed with imperfect tape masks. Since the putty can be pushed right up the edges, it creates a good seal and it can be stretched until it's nearly transparent and still masks.
Next up for painting is the shoulders and arms. I'll detail the skirt and torso panel lines and assemble them while waiting for the paint the cure. It's actually starting to look pretty good.
[ 07.25.10 ]
While painting the last gold color, I was getting some excessive clogging in my airbrush and decided to buy a new Iwata HP-C Plus to try out. It seems to have much higher airflow for the same PSI setting, but like my Eclipse, I find it difficult to get a really good mist from it. I started by masking the grey and spraying a base black layer for the rest of the metallics.

Then sprayed the silver and gold, removed the masks and applied a glossy clear coat to all the metallic parts. While there was less clogging, there were more large particles that sprayed out causing lumps in the surface. I tried scraping these off after they dried and it doesn't look too bad, but there is a clear difference between the parts sprayed with the G44 versus the HP-C Plus when inspected closely.

The rest of the parts are painted and just some detail lines are left to paint. The shoulder decals need to be applied and a final clear coat.

I don't think any parts need a flat surface as they're all mechanical, but maybe some of the interior parts could be. Anyway, that should be it, just assembling everything and it should be finished soon! It only took a year to do. :P
[ 08.01.10 ]
Finished assembling the major parts and dry fitting them to check for correct fit. With so many parts and some very tight fits, I ended up scratching some paint that will need to be touched up after final assembly. Here's the underside of the skirt to show the panel work.

And all the major parts.

And the dry fit.

A few smaller pieces still need to be attached, but the will go on last to avoid any damage. Just need some touch up paint, a simple base and it should be done.
[ complete ]
The finished photos are in the gallery here.
( ... read more » )


 Subscribe in a reader