
[ 08.30.08 ]
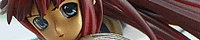
This kit arrived last week and I've just gotten around to laying out all the parts to examine them. It is one of the 100 limited resin kits of Griffin's Goth Punk Mikuru from WF2008. Many thanks to gundamjehutykai for letting me know it was available as a kit or I probably wouldn't have gone to look for it! And many thanks to Hyou for snagging it for me on such short notice!
These photos came inside the box, including a nice detail of the eyes to show how they should be painted:
Here are all the parts laid out, mostly clean cast with a bit of flash and some minor seams throughout. The biggest concern are some really thin areas to the point that the resin is nearly transparent. I think it will just need extra care when sanding and prepping the surface. Nothing to really worry about unless I mess it up.
There's also no castoff option as the skirt is molded onto the waist, but this makes things much easier. ^^;; I love kits with lots of parts as I think they end up more detailed and this is 47 parts with no guitar! But in keeping with the music theme of Haruhi and Yuki, I'm thinking of giving her a tambourine - her left hand looks like it should be holding onto something and that just might be perfect.
I'm going to start prepping her while waiting for Alita's paint to cure and we'll see how well I can manage to juggle two kits at once.[ 01.31.09 ]
Well, that didn't pan out like I had planned. Here it is 5 months later and Mikuru is finally pinned. Still not prepped yet and on closer inspection, some of the parts will need a bit of work. The casting is poor on the small parts - belts, ribbons, hands and they are going to be very delicate to work with. The belt is worrisome as it comes in two parts, is too thin to pin and there's not enough surface area to make a strong glue bond.
I've been looking around for reference pictures and it seems there's only one piece of artwork that the sculpt is based on. I've also found lots of pictures of the mass produced PVC to compare with and there's just something odd about the color of the hair and eyes on the PVC. They don't look like the reference photos of the original figure above, which already felt a bit too red from the original artwork.
Since I have a clean canvas, so to speak, I'm feeling that it would be a shame to build her to look just like the mass produced PVCs. I'm thinking about ways to not stray from the original artwork, yet make her more unique. Using the artwork as reference, a couple things stand out - the boots are dark brown and not black, the outer skirt has a spider web lace texture, and she's not wearing the "leg warmers" which I think came from the garb on the ground behind her.
The lace is probably too hard to simulate, though I do have some extra nylon stocking fabric, that I could try on the skirt to give it texture. Or possibly give her thigh-high stockings which also goes with a goth motif. There's not much you can do with black, white and red colors, although there is a pink laced shirt on the ground behind her as well, and I could make a pink version instead. Maybe she would stop crying if she were wearing pink.. ^^;; poor poor Mikuru.[ 02.17.09 ]
All right, all the parts have been washed and cleaned up, but there were a ton of these micro pin holes on a lot of the surfaces, especially on the hair pieces. The grey epoxy putty I normally use can't really get into the space, so I tried using thinned Bondo glazing putty which other modelers have had success with.
The Bondo is quite a bit softer than epoxy putty and seems to need multiple applications - or more likely, I'm just not using it right. But being softer, it ends up feathering really well when sanded, just have to restrain from sanding too hard. I've sanded the putty down and then reapplied where needed: rinse, repeat.
The two belt halves have been attached using 2 part epoxy, which is flexible enough so it doesn't shear like CA glue would. It actually feels pretty strong, but I've yet to sand it flush and see if it continues to hold. While this is happening, I think I will start painting the eyes. Haven't done that in a while, so hope I remember how. ^^;;[ 02.22.09 ]
Some results after sanding down the Bondo, which really shows some of the nastiness of the surface. So far, I'm not too fond of using Bondo though. Even with light sanding, it still feels too soft and sands away much faster than the resin.
It's also not a neutral tone and requires more priming passes to get a uniform base color, which sort of defeats the point of using it as a surface putty. The more you spray, the more detail gets lost - for the hair, it probably doesn't matter, but the other parts, I need to find a better way. The grey epoxy putty was neutral in tone and never had this issue, I just wish it could be thinned.[ 03.01.09 ]
I started painting some of the parts this weekend. Wasn't sure how the tie would turn out, but it looks pretty good. I bought this Scotch "Artist tape for curves", which is low tack and stretchable and produces a much better seal than masking tape for sharp lines. Cut it in thin strips to make the masks for the stripes on the tie.
Also used it for the curves on the flaired legging with good results, but decided to use masking tape on the triangular flags since this stuff is more expensive. The masking tape ended up lifting some of the red paint in a few spots which will need touch-up, so maybe it would have been worth the better tape to save some trouble. A light mist of black over the red will darken it as well as give it some much needed shading.
I ordered some Aves Apoxie Sculpt and safety solvent to try on the problem parts. It's a non-toxic, thinnable 2 part epoxy putty which I should have tried in the first place, but the Bondo was easier to get a hold of locally. I broke my non-toxic materials rule with the Bondo, so that nasty stuff is staying in the garage forever.[ 03.09.09 ]
I sprayed a second layer of black this weekend as well as a light misting over the red to darken and shade, then a sealer to protect the paint. The belt buckles and eyelets need painting, then a final finish on these parts. I think the belts will stay glossy, and a satin finish on the rest.
The eyes were painted as well, using orange and brown instead of red. Definitely forgot how to paint them and had to try 3 times before I was happy with them. I think all of the difficult work is done though, so the rest of it should be fairly simple and hopefully go faster.[ 03.22.09 ]
I ended up drilling out most of the Bondo filler on the main body parts and replacing them with Apoxie Sculpt. These were going to get a light flesh tone and would have needed a dark base layer to mask the Bondo and that affects the color of the flesh on top. I got the white Apoxie, but it actually blended to a light grey, not quite the color of white resin, but still neutral enough to blend in.
I also sprayed the flesh tone on some of the white parts as a pre-shading. It's a very tight shirt and usually the folds would look whiter than the parts that touch the skin. I'm hoping when I spray over with white, it'll give the whole thing a good effect.
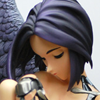
The hair took me a few tries to get the color the way I wanted - a rusty orange like the artwork and the anime, but mixing this turned out rather difficult. It usually wanted to turn too red or too brown, but I finally got this look by spraying a base of orange, shading with a muddy brown and then spraying with a light mist of red mixed into the orange.
This is what it looked like before the red was misted over along with the two base colors used. Next is shading the skin and painting the white parts, which I'm still debating if I should do a light pink. Then the final finish coats and assembly.[ 03.29.09 ]
I decided to go ahead with a light pink after trying out the plain white. It's actually the plain white as a base, but the shading is done in pink and gives the whole thing a pink look. I also finished hand painting the face details and did the shoes in a dark brown leather with black soles.
There's just the black laces on the shirt and skirt left to do and they'll be hand painted. I don't think I'm going to do anything extra since I'm feeling lazy now and haven't found the inspiration. I'll still need to figure out how to attach the chains that came with the kit and make some sort of base. Though she does stand on her own, I'd like it to be a little more earthquake proof.
Here's an interim photo of the body parts with a single layer of white to show how the skin shading came through. It's a good reference for if I want try this again with some other kit in the future. A second layer of white was applied to get a more solid white look and the pink over that. There's still some of the skin tone that shows through on the pink version, but the pink tends to be overpowering so the effect is very subtle.
[ 04.04.09 ]
I finished assembling all of the major parts and attaching the chains. There's not really any guide on where to attach the chains, just a diagram on how to attach the hooks to the belt, so I ended up winging it to create nice looking loops. There's a lot more chain material and hooks in the kit than is used in the PVC, so I have larger loops and a few more loops on the back.

Since the belt has to go onto the main body before it is attached to the skirt, the chains really needed to be attached to the belt beforehand, or else there wouldn't be enough room to work on it without risk of damaging the main body. I just used the top of a plastic bottle to hold the belt while I attached the chains, then transferred the whole thing to the main body before attaching the skirt.
I do like how the pink shading turned out on the main body and am very happy with the result. All that's left is to assemble the major parts and then attach the small ribbons which are a little fragile, so they are going on at the end.
[ complete ]
Figure post is here.


 Subscribe in a reader
1 comment:
Part too thin to pion and not enough surface area to glue easily? Sounds like the problem I had when gluing the ribbons on the arms of my C.C a while back.
Can't really advise on a best course of action for that one. I just used superglue and a very steady hand. The glue was strong enough to hold the part in but you could still easily snap the parts off...
Good luck with your mods too. Modifying a kit is always a pain, but it can be worth it!
Post a Comment