Saturday, September 4, 2010

[wip] Pinky Archer & Rin


[ 02.17.09 ]
I've started working on these pinky resin kits of Archer and Rin to give Saber some company. They're characters from Fate/Stay Night, but these two come from a different sculptor. I really like the Archer pose, though there's something about the Rin that bothers me, but I can't quite pin-point what it is yet.


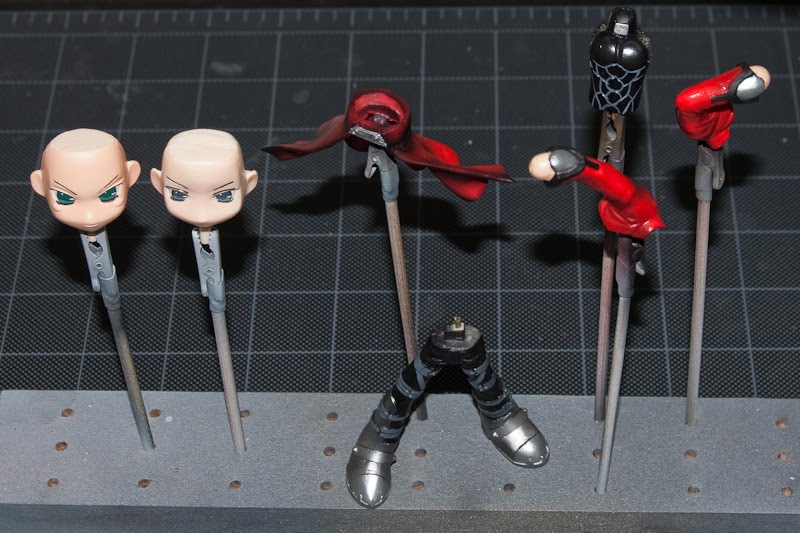
Anyway, these parts have been washed, pinned and some putty applied. Rin's cheeks don't have the typical pinky dots, so will need some work to see if I can fix it. Maybe that's what's bugging me about her. Still looking around for reference material to see how I should paint them.


[ 03.15.09 ]
I did this a while ago but forgot to update this post. Here's Rin's face with the dots sculpted onto the cheeks, but I'm going to leave Archer's face without. The eyes were painted while I was painting Mikuru's eyes. They're done in flat tones for a more pinky style face rather than mixed like I do with the regular kits.


I've started painting some of the other parts, but still haven't got a hang of how to schedule the painting with multiple kits. Right now, I'm just doing them in batches, so similar colors get painted together, but it just feels like I'm doing one big kit instead of making better use of time. :P


[ 08.20.10 ]
Yes, some progress on these guys. I think I have to focus on finishing them up or they'll never get done. ^^;;;


Archer's legs have some putty work that need to be done where the resin was not cast properly and I didn't notice it until late - that's why it wasn't painted in this batch although it shares the same colors.

And my jar of flesh tone has completely dried out over the past year so I need to mix more. I had already sprayed the faces before I stopped working on them, so there might (likely) be a mismatch in the tone, but luckily it is just the "hands" and Rin's thighs that need the color. I think it should be ok.


[ 08.27.10 ]
Got around to painting the base coats for all the red parts, as well as a base coat for Archer's legs after doing some putty work on it. Ended up making some new rivets for a couple of the straps that were deformed.


And some shading work I tried doing with the HP-C+. I'm not happy with it, there's too much spatter and little of the smooth fade you see in my previous kits. I kept wishing there was a mac valve on it and there's not fine enough control at the regulator.


[ 09.04.10 ]

[RANT] I absolutely *HATE* the new blogspot post editor. It screws up all the span tags and spacing in the compose view and you can't insert images in the HTML view. It is extremely painful now to extend posts, and I give up on trying to get it right. Thank you Google.[/RANT]

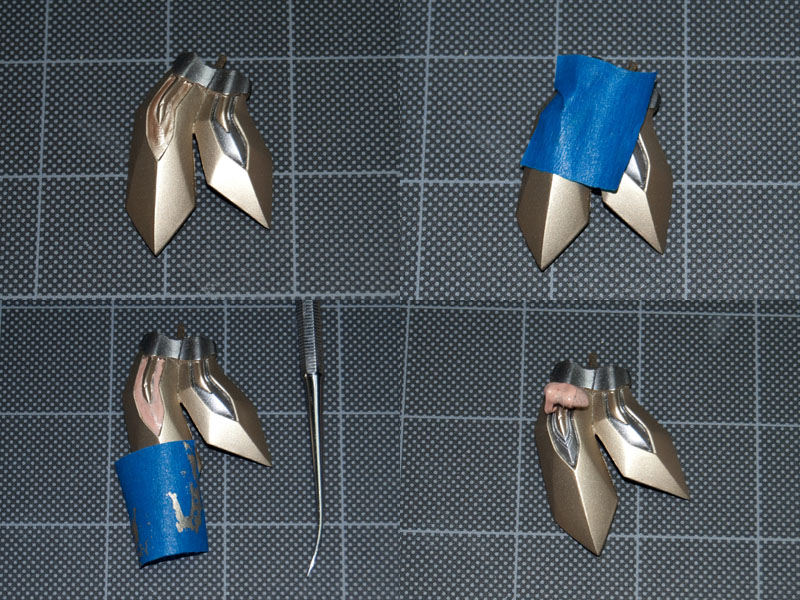
Anyway, I have the legs masked and the silver parts painted and some new flesh tone painted.


With most of the detail work done, there is just some cleanup left to do and to figure out how to paint the daggers. The parts aren't very detailed, so I don't know if they will look anything like they are supposed to, but I am looking for reference material on what they look like anyway.


That'll be the last of it except for final finishes and assembly, they should be done this weekend and move on to something new.

[ complete ]

Finished photos can be found here.

( ... read more » )

Sunday, August 1, 2010

[wip] Schpeltor


[ 05.14.09 ]

Kaien was looking for someone to build this kit she got for her birthday and as I have all the tools, I offered to build it for her. For me, it'll be interesting and fun to build a non-figure kit and as it is still resin, it should be mostly the same process. The kit is the FSS Water Dragon "Schpeltor" from Work Shop Cast.


Inside the box are the familiar bags of resin parts and an assembly sheet - these things are very simple diagrams, so they take some time to figure out how the pieces all fit together, and there are a LOT of pieces in this kit. What's new for me are the white metal parts and the decal sheet.

I don't know why some parts were cast in metal instead of resin as they aren't more detailed than resin. Some of them are thin and long, so perhaps the metal is less prone to warping, but is still slightly piable. The sword hook is probably stronger using metal, so less likely to break. If anybody knows the real reason for metal parts in a resin kit, please let me know.


I've just started removing the parts from the gates, sorting them into their groups and examining them in the process. There are extra hands for different poses of the sword, as well as parts to build either the original Water Dragon or the modified Kaien version. We'll be building the latter verion, naturally. :)


Most of the parts are clean cast, but there are some problem areas. Some of the resin was not mixed properly before casting, so a few of the parts have uncured blobs in them. They have a consistency like dried syrup when poking at it with a knife. There are also the usual surface pinholes, seam lines and a few paper thin areas that need cleaning up and puttying. Save that for later while I look for some reference material.

[ 05.25.09 ]

I did some basic flash removal so the parts could be pinned together. There are lots of parts, about 73 used in this version and a half-dozen more for the other version. Here's the dry fitted kit, held together with just pins and some tape on the metal parts (the metal parts are pinned as well, but they won't hold without glue).


The kit has some sort of "free pose" so the joints aren't snug like other kits. They can be posed and then pinned into the pose, but it's sort of a pain to fit together, making it difficult to tell if it's done right or wrong until the rest of the kit is assembled and balanced.


Now to break it all down again and start cleaning up the parts. A few seams need to be puttied and a few parts straightened. But I think the most time is going to be filling in all the pinholes, more than I've seen in any kit so far.. *sigh*

[ 07.01.10 ]

Wow, it's been over a year since the last update on this project and yes, it's still being worked on.. ^^;;

I took a year off to focus on other activities, some much needed socializing, and took a trip to Japan - maybe I'll post some pictures. I finished relocating all the hobby stuff to the basement, built a new spray booth area and started off painting the difficult white. It has some micro pearl powder in it to give it a metallic look.


And then the gray, with a black wash on the panel lines. The lines are a little messy right now, but a Q-tip with some solvent will clean it up easily.


Then silver and gold on all the leg parts, which needed a lot of masking.


The decals are applied on the legs, and then brushed with decal setter to mold them to the part. The decals were larger than the part and needed to be cut up to fit properly as shown in the instructions - yes, it was designed that way. After careful aligning, they came out pretty nice. You can't see the seams, which I think is pretty good for a first try at decals.


Up next will be painting the skirt, while finish detailing the torso and assembling the main body. We'll see if that takes me another year. ;)

[ 07.08.10 ]

The legs are assembled, but the hip and ankle joints are not yet glued so they can be adjusted for stance when the full kit is done. I'm thinking about making it disassemble at the torso, so it can be packed easier for moving.


The skirt and main torso parts are painted with their base colors and then some silver painted. Gold will go on top of the remaining black base coat. I wanted to do a two-tone on the detail part of the shoulder blades, so that area has been painted with silver and then masked for the gold coat.


I tried using tape for masking but the irregular shape and curve made it extremely difficult. I ended up filling the area with silly putty as a masking agent and it turned out to be simple. The putty is very stretchy and only slightly tacky, so I just used a pick to push it around where I wanted to mask.


Sprayed the gold layer and let it cure. At first, I tried picking off the mask, but it got a little messy with the paint layer on top - it crumbles and gets everywhere. The paint doesn't adhere well to the silly putty, so I lightly smoothed some tape over the putty and it pulls off the paint easily. Then take a ball of putty and roll it over the mask and it lifts right off. Since there's relatively little paint remaining on the mask, the ball of putty could probably be reused a few times. But silly putty is pretty cheap anyway and a tiny piece can stretch to a large area.


Since it worked so well, I used the same masking technique to the inside panels of the skirt parts. The masks are very clean with almost no post clean up that's usually needed with imperfect tape masks. Since the putty can be pushed right up the edges, it creates a good seal and it can be stretched until it's nearly transparent and still masks.

Next up for painting is the shoulders and arms. I'll detail the skirt and torso panel lines and assemble them while waiting for the paint the cure. It's actually starting to look pretty good.

[ 07.25.10 ]

While painting the last gold color, I was getting some excessive clogging in my airbrush and decided to buy a new Iwata HP-C Plus to try out. It seems to have much higher airflow for the same PSI setting, but like my Eclipse, I find it difficult to get a really good mist from it. I started by masking the grey and spraying a base black layer for the rest of the metallics.


Then sprayed the silver and gold, removed the masks and applied a glossy clear coat to all the metallic parts. While there was less clogging, there were more large particles that sprayed out causing lumps in the surface. I tried scraping these off after they dried and it doesn't look too bad, but there is a clear difference between the parts sprayed with the G44 versus the HP-C Plus when inspected closely.


The rest of the parts are painted and just some detail lines are left to paint. The shoulder decals need to be applied and a final clear coat.


I don't think any parts need a flat surface as they're all mechanical, but maybe some of the interior parts could be. Anyway, that should be it, just assembling everything and it should be finished soon! It only took a year to do. :P


[ 08.01.10 ]

Finished assembling the major parts and dry fitting them to check for correct fit. With so many parts and some very tight fits, I ended up scratching some paint that will need to be touched up after final assembly. Here's the underside of the skirt to show the panel work.


And all the major parts.


And the dry fit.


A few smaller pieces still need to be attached, but the will go on last to avoid any damage. Just need some touch up paint, a simple base and it should be done.

[ complete ]

The finished photos are in the gallery here.

( ... read more » )

Sunday, April 26, 2009

AeroGarden, First Planting


[ 03.08.09 ] Planting

I recently picked up an AeroGarden Elite when it was on sale at Costco. I love growing things and have about 20 plants in my home started from seeds or cuttings and many more that I've given away. When I first heard about the AeroGarden, I thought it would be cool to play with, but it was way too expensive for what it does. So, when it was on sale last week, my curiosity took over my wallet.


The Elite has 6 pods and the Costco version came with 2 bulb kits (4 bulbs) and 2 herb seed kits (12 pods) for $89. The kits themselves run about $20 each, so I justified it by thinking I got the unit for $10. ^^;; Obviously, the bulbs and seed kits are still way too expensive, considering you can get a gram of herb seeds for under $1, and the bulbs are just 26W daylight spectrum CFLs with a proprietary connector.

It does look like it may be possible to modify the hood to take standard bulbs, though you'd want the pin kind and not the edison kind. I'll look into that after I've used up the kits it came with as well as how to make my own pods.

The unit is essentially a water bowl with a small air pump (sounds like an aquarium pump) aerating the water with nutrients, which soak up into the pods like a self watering planter. The roots then grow down into the water, while the hood is height adjustable to get the optimum light as the plant grows. The little clear dome caps act like mini greenhouses while the seedlings establish roots. Since I have this bright light on anyway, I brought over some plants that aren't getting enough light in the winter and see how good the light is.

There is a low-pitch hum from the pump that could get annoying if you are always in the same room, but I suspect it's not any worse than an aquarium that uses an air pump. It is much louder than my aquarium that uses a Whisper bio-filter though.

As for the herb kit, 4 of the seeds I've grown before using standard planters, so it will be interesting to compare the results. I'll update with weekly photos so we can watch them grow. ^^


[ 03.15.09 ] Week 1

Amazingly, just one day after planting the basil had a tiny sprout, which was followed by thyme and oregano on day 2. Mint sprouted on day 5 and chives on day 6. The dill hasn't sprouted yet, but it's labeled at 7-14 days for germination, which is still short when compared to my packet of dill seeds listed at 21-24 days. One week and we have 5 of the 6 pods with tiny sprouts. They're so cute.


I had a problem with the mint pod, the spongy material inside didn't seem to expand like the others and didn't rise to the surface. Kaki-mei said she was having the same problem with her pods and suggested lifting it manually. I took a toothpick and gently prodded it up and it worked. It actually had expanded, but since the pod is tapered, it jammed itself into the bottom of the pod and couldn't rise.


The basil which has the fastest germination time of the pods is listed at 3-7 days, but only took 1 day for the first seed to show growth. After the minimum 3 days, it had these nice sprouts.

I also did some research on the hum noise and it looks like the 6 pod units have an "advanced grow" system which uses a noisier air pump/stone to aerate the water instead of an impeller to move the water. An impeller is what a biofilter uses and aerates by moving water in a waterfall fashion. They are nearly silent, but since it moves water, it requires more maintenance over time. It's also why the 7-pod seed kits are not compatible with the 6-pod units, since the pods get water from the impeller, they are shorter and don't reach the water bowl like the 6-pod kits do.


[ 03.22.09 ] Week 2

Two LEDs on the base unit lit up today, one to add nutrient tablets to the bowl and the other to add more water. There aren't any sensors, so these are just on a timer, which I obeyed and hit the reset button to restart the timers. The seed kit came with 8 packets of nutrient tablets, which is about 4 months at a 2 week cycle. Anyway, all of the pods have sprouted and I removed the domes on 4 of the pods.


The chives, which were the last to sprout, grew very fast and bumped into the dome, so I had to remove it. However, only two of the seeds had sprouted, and I don't know if more will sprout later with the dome off. The other pods all have many seeds growing and you can actually see the roots coming out of the sponges through the water refill flap.

I'm a little concerned about the growing surface that the pods sit on, it's kind of thin and I can tell it is already warping, either from the heat of the lamps or the weight of the pods. The corners already won't sit flush to the bowl like it did 2 weeks ago. Kaki told me a few days ago that all three of her Aerogarden pumps broke at almost the same time after a year. So much for quality. :(


[ 03.29.09 ] Week 3

All of these little guys are doing well after 3 weeks. The chives still only have two seeds that sprouted, though they each sent up another branch. At this rate, it doesn't seem like there will be enough chives to harvest. The tending guide shows about 8 seeds sprouting in the sample picture, but I got just 2.


The tending guide also suggests the plants start being pruned at weeks 3-5. So far, none of them seem large enough to be pruned yet. The largest, basil, is still just shy of 3" tall - probably another inch and it can be pruned. I haven't had to raise the lamp yet, so it is still on the lowest position.


[ 04.05.09 ] Week 4

Another 2 week cycle and the base was blinking for more tablets and water today. I also raised the lamp one notch as the basil is growing very fast, even after pruning the growth above the 3rd branches.


Nothing was happening with the chives pod, so I popped it out to check inside and to my horror the un-germinated seeds had a film of grey/white mold on them. I took my tweezers and pulled them all out and then rinsed the pod under running water. The other pods all looked ok, but the chives pod will need daily attention (although the two plants look healthy). I will toss the pod if any mold comes back, though I am considering just tossing it now and taping over the empty hole. Totally was not expecting that.


[ 04.13.09 ] Week 5

Late posting due to income taxes being due this week. Here's the growth for the last week:


I've started trimming all the pods and used the first trimmings in an omelette. Even though the trimmings were few, it added a lot of fresh flavor. I think the basil is growing a bit too fast - if I raise the hood, I'm concerned the lamps may be too high for the other pods. I'm going to just start removing the larger leaves of the basil, since it is shading the lower leaves and pods, in an attempt to even out the plant heights before raising the lamp another notch.

Also, no hint of any new mold in the chives pod, and the two chives each grew another shoot. If it continues to grow a shoot a week, it might not be too bad.


[ 04.26.09 ] Week 6 & 7

Here's the week 6 photo which I forgot to post - the plants were trimmed and the lamp raised another notch:


Mid-week, some of the plants looked like they were starting to wilt and looking in the tank, the water level was very low. The plants were only getting water from the longer roots, so I refilled the tank. 3 days later, it needed another 4 cups of water, so the plants are absorbing enough water that the 2 week timer simply isn't sufficient any more. At this stage, I need to add water at least weekly. Here's the week 7 photo:


The plants were big enough that the lamp was raised another notch. Except for the chives, there's enough growth to harvest each weekend, I think even more often, but I only get to cook on the weekends. I will call the chives a failure, since only two of them sprouted, there wasn't enough growth to cover the hole on the pod. This let light leak through allowing algae to grow. I've covered the hole with a small bit of painters tape to block out the excess light.

What's nice about this set of herbs is that most of it goes well together, so if you're not using a recipe and just want to add some flavor, pinch a twig off two or three plants and you're all set. Here's what I made with some trimmings this weekend - a seared shrimp with garlic sauce over pasta, topped with toasted parmesan and bread crumbs:


I'm not a good cook, so it's not the prettiest thing, but it's delicious and the fresh herbs are very flavorful. I think the appeal with something like this is you don't have to plan ahead on what to buy. Whatever I'm making, I find myself thinking if anything will go well with it and just pinch it off. ^^;;

Anyway, apart from the chives, this is what you could expect from the herb seed kit. In under 2 months, the plants are mature and producing plenty of fresh herbs to use. This will be the last update until I run out of nutrient tablets. I'll update with how long the plants survive without the tablets.

( ... read more » )

Gallery Links

Pinky Rin Archer Schpeltor Mikuru Asahina Angel Rebirth Moyashimon Satsuki Ikaruga Yuki Nagato Pinky:St Saber Mina Tsukishiro Haruhi Suzumiya

About This Blog

My photo
Sunnyvale, California, United States

A blog of my hobbies and a place to show progress and finished models. Galleries are embedded as slideshows to reduce page load time, but you can open any album by clicking on its label.

dannychoo.com

figure.fm

Akiba-Station

Through the Looking Glass