Showing posts with label resin kits. Show all posts

Wednesday, September 8, 2010

[figure] Pinky Rin & Archer


Here are the finished resin kits of Rin and Archer in pinky style, along with the previous Saber. These two are from a different sculptor and I'm not too fond of the shape of Rin's face compared to the more rounded shape of Saber's. It just seems to me a bit too big and "normal" as if it might fit on a full sized figure instead.


Medium: airbrushed acrylics on resin. Scale: non @ 10-11cm. 6 photos, the rest embedded here:


( ... read more » )

Saturday, September 4, 2010

[wip] Pinky Archer & Rin


[ 02.17.09 ]
I've started working on these pinky resin kits of Archer and Rin to give Saber some company. They're characters from Fate/Stay Night, but these two come from a different sculptor. I really like the Archer pose, though there's something about the Rin that bothers me, but I can't quite pin-point what it is yet.


Anyway, these parts have been washed, pinned and some putty applied. Rin's cheeks don't have the typical pinky dots, so will need some work to see if I can fix it. Maybe that's what's bugging me about her. Still looking around for reference material to see how I should paint them.


[ 03.15.09 ]
I did this a while ago but forgot to update this post. Here's Rin's face with the dots sculpted onto the cheeks, but I'm going to leave Archer's face without. The eyes were painted while I was painting Mikuru's eyes. They're done in flat tones for a more pinky style face rather than mixed like I do with the regular kits.


I've started painting some of the other parts, but still haven't got a hang of how to schedule the painting with multiple kits. Right now, I'm just doing them in batches, so similar colors get painted together, but it just feels like I'm doing one big kit instead of making better use of time. :P


[ 08.20.10 ]
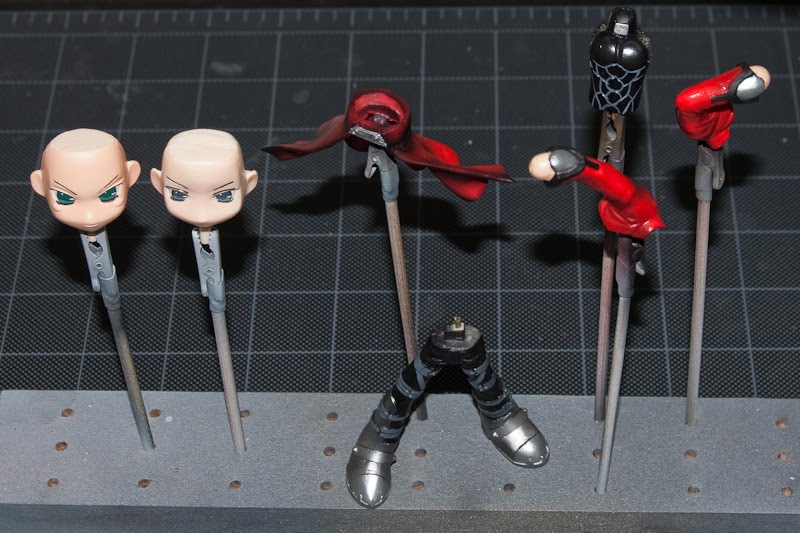
Yes, some progress on these guys. I think I have to focus on finishing them up or they'll never get done. ^^;;;


Archer's legs have some putty work that need to be done where the resin was not cast properly and I didn't notice it until late - that's why it wasn't painted in this batch although it shares the same colors.

And my jar of flesh tone has completely dried out over the past year so I need to mix more. I had already sprayed the faces before I stopped working on them, so there might (likely) be a mismatch in the tone, but luckily it is just the "hands" and Rin's thighs that need the color. I think it should be ok.


[ 08.27.10 ]
Got around to painting the base coats for all the red parts, as well as a base coat for Archer's legs after doing some putty work on it. Ended up making some new rivets for a couple of the straps that were deformed.


And some shading work I tried doing with the HP-C+. I'm not happy with it, there's too much spatter and little of the smooth fade you see in my previous kits. I kept wishing there was a mac valve on it and there's not fine enough control at the regulator.


[ 09.04.10 ]

[RANT] I absolutely *HATE* the new blogspot post editor. It screws up all the span tags and spacing in the compose view and you can't insert images in the HTML view. It is extremely painful now to extend posts, and I give up on trying to get it right. Thank you Google.[/RANT]

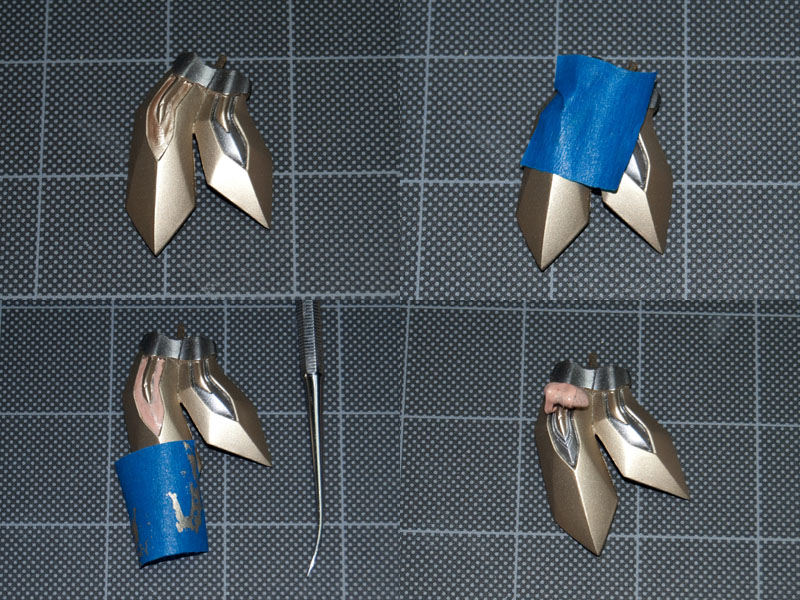
Anyway, I have the legs masked and the silver parts painted and some new flesh tone painted.


With most of the detail work done, there is just some cleanup left to do and to figure out how to paint the daggers. The parts aren't very detailed, so I don't know if they will look anything like they are supposed to, but I am looking for reference material on what they look like anyway.


That'll be the last of it except for final finishes and assembly, they should be done this weekend and move on to something new.

[ complete ]

Finished photos can be found here.

( ... read more » )

Sunday, August 1, 2010

[wip] Schpeltor


[ 05.14.09 ]

Kaien was looking for someone to build this kit she got for her birthday and as I have all the tools, I offered to build it for her. For me, it'll be interesting and fun to build a non-figure kit and as it is still resin, it should be mostly the same process. The kit is the FSS Water Dragon "Schpeltor" from Work Shop Cast.


Inside the box are the familiar bags of resin parts and an assembly sheet - these things are very simple diagrams, so they take some time to figure out how the pieces all fit together, and there are a LOT of pieces in this kit. What's new for me are the white metal parts and the decal sheet.

I don't know why some parts were cast in metal instead of resin as they aren't more detailed than resin. Some of them are thin and long, so perhaps the metal is less prone to warping, but is still slightly piable. The sword hook is probably stronger using metal, so less likely to break. If anybody knows the real reason for metal parts in a resin kit, please let me know.


I've just started removing the parts from the gates, sorting them into their groups and examining them in the process. There are extra hands for different poses of the sword, as well as parts to build either the original Water Dragon or the modified Kaien version. We'll be building the latter verion, naturally. :)


Most of the parts are clean cast, but there are some problem areas. Some of the resin was not mixed properly before casting, so a few of the parts have uncured blobs in them. They have a consistency like dried syrup when poking at it with a knife. There are also the usual surface pinholes, seam lines and a few paper thin areas that need cleaning up and puttying. Save that for later while I look for some reference material.

[ 05.25.09 ]

I did some basic flash removal so the parts could be pinned together. There are lots of parts, about 73 used in this version and a half-dozen more for the other version. Here's the dry fitted kit, held together with just pins and some tape on the metal parts (the metal parts are pinned as well, but they won't hold without glue).


The kit has some sort of "free pose" so the joints aren't snug like other kits. They can be posed and then pinned into the pose, but it's sort of a pain to fit together, making it difficult to tell if it's done right or wrong until the rest of the kit is assembled and balanced.


Now to break it all down again and start cleaning up the parts. A few seams need to be puttied and a few parts straightened. But I think the most time is going to be filling in all the pinholes, more than I've seen in any kit so far.. *sigh*

[ 07.01.10 ]

Wow, it's been over a year since the last update on this project and yes, it's still being worked on.. ^^;;

I took a year off to focus on other activities, some much needed socializing, and took a trip to Japan - maybe I'll post some pictures. I finished relocating all the hobby stuff to the basement, built a new spray booth area and started off painting the difficult white. It has some micro pearl powder in it to give it a metallic look.


And then the gray, with a black wash on the panel lines. The lines are a little messy right now, but a Q-tip with some solvent will clean it up easily.


Then silver and gold on all the leg parts, which needed a lot of masking.


The decals are applied on the legs, and then brushed with decal setter to mold them to the part. The decals were larger than the part and needed to be cut up to fit properly as shown in the instructions - yes, it was designed that way. After careful aligning, they came out pretty nice. You can't see the seams, which I think is pretty good for a first try at decals.


Up next will be painting the skirt, while finish detailing the torso and assembling the main body. We'll see if that takes me another year. ;)

[ 07.08.10 ]

The legs are assembled, but the hip and ankle joints are not yet glued so they can be adjusted for stance when the full kit is done. I'm thinking about making it disassemble at the torso, so it can be packed easier for moving.


The skirt and main torso parts are painted with their base colors and then some silver painted. Gold will go on top of the remaining black base coat. I wanted to do a two-tone on the detail part of the shoulder blades, so that area has been painted with silver and then masked for the gold coat.


I tried using tape for masking but the irregular shape and curve made it extremely difficult. I ended up filling the area with silly putty as a masking agent and it turned out to be simple. The putty is very stretchy and only slightly tacky, so I just used a pick to push it around where I wanted to mask.


Sprayed the gold layer and let it cure. At first, I tried picking off the mask, but it got a little messy with the paint layer on top - it crumbles and gets everywhere. The paint doesn't adhere well to the silly putty, so I lightly smoothed some tape over the putty and it pulls off the paint easily. Then take a ball of putty and roll it over the mask and it lifts right off. Since there's relatively little paint remaining on the mask, the ball of putty could probably be reused a few times. But silly putty is pretty cheap anyway and a tiny piece can stretch to a large area.


Since it worked so well, I used the same masking technique to the inside panels of the skirt parts. The masks are very clean with almost no post clean up that's usually needed with imperfect tape masks. Since the putty can be pushed right up the edges, it creates a good seal and it can be stretched until it's nearly transparent and still masks.

Next up for painting is the shoulders and arms. I'll detail the skirt and torso panel lines and assemble them while waiting for the paint the cure. It's actually starting to look pretty good.

[ 07.25.10 ]

While painting the last gold color, I was getting some excessive clogging in my airbrush and decided to buy a new Iwata HP-C Plus to try out. It seems to have much higher airflow for the same PSI setting, but like my Eclipse, I find it difficult to get a really good mist from it. I started by masking the grey and spraying a base black layer for the rest of the metallics.


Then sprayed the silver and gold, removed the masks and applied a glossy clear coat to all the metallic parts. While there was less clogging, there were more large particles that sprayed out causing lumps in the surface. I tried scraping these off after they dried and it doesn't look too bad, but there is a clear difference between the parts sprayed with the G44 versus the HP-C Plus when inspected closely.


The rest of the parts are painted and just some detail lines are left to paint. The shoulder decals need to be applied and a final clear coat.


I don't think any parts need a flat surface as they're all mechanical, but maybe some of the interior parts could be. Anyway, that should be it, just assembling everything and it should be finished soon! It only took a year to do. :P


[ 08.01.10 ]

Finished assembling the major parts and dry fitting them to check for correct fit. With so many parts and some very tight fits, I ended up scratching some paint that will need to be touched up after final assembly. Here's the underside of the skirt to show the panel work.


And all the major parts.


And the dry fit.


A few smaller pieces still need to be attached, but the will go on last to avoid any damage. Just need some touch up paint, a simple base and it should be done.

[ complete ]

The finished photos are in the gallery here.

( ... read more » )

Wednesday, April 8, 2009

[figure] Goth Punk Mikuru


This is one of the 100 limited edition resin kits of Griffon's Goth Punk Mikuru. For those interested, the build up for this kit is here.

I painted her in light pink to differentiate from the standard white PVC version. She also has toned down hair and eye color to more closely match the artwork the figure is based on.

Medium: airbrushed acrylics on resin. Scale: 1/7 @ 24.5cm. 16 photos in this set.


( ... read more » )

Saturday, April 4, 2009

[wip] Goth Punk Mikuru


[ 08.30.08 ]

This kit arrived last week and I've just gotten around to laying out all the parts to examine them. It is one of the 100 limited resin kits of Griffin's Goth Punk Mikuru from WF2008. Many thanks to gundamjehutykai for letting me know it was available as a kit or I probably wouldn't have gone to look for it! And many thanks to Hyou for snagging it for me on such short notice!

These photos came inside the box, including a nice detail of the eyes to show how they should be painted:


Here are all the parts laid out, mostly clean cast with a bit of flash and some minor seams throughout. The biggest concern are some really thin areas to the point that the resin is nearly transparent. I think it will just need extra care when sanding and prepping the surface. Nothing to really worry about unless I mess it up.


There's also no castoff option as the skirt is molded onto the waist, but this makes things much easier. ^^;; I love kits with lots of parts as I think they end up more detailed and this is 47 parts with no guitar! But in keeping with the music theme of Haruhi and Yuki, I'm thinking of giving her a tambourine - her left hand looks like it should be holding onto something and that just might be perfect.

I'm going to start prepping her while waiting for Alita's paint to cure and we'll see how well I can manage to juggle two kits at once.


[ 01.31.09 ]

Well, that didn't pan out like I had planned. Here it is 5 months later and Mikuru is finally pinned. Still not prepped yet and on closer inspection, some of the parts will need a bit of work. The casting is poor on the small parts - belts, ribbons, hands and they are going to be very delicate to work with. The belt is worrisome as it comes in two parts, is too thin to pin and there's not enough surface area to make a strong glue bond.


I've been looking around for reference pictures and it seems there's only one piece of artwork that the sculpt is based on. I've also found lots of pictures of the mass produced PVC to compare with and there's just something odd about the color of the hair and eyes on the PVC. They don't look like the reference photos of the original figure above, which already felt a bit too red from the original artwork.


Since I have a clean canvas, so to speak, I'm feeling that it would be a shame to build her to look just like the mass produced PVCs. I'm thinking about ways to not stray from the original artwork, yet make her more unique. Using the artwork as reference, a couple things stand out - the boots are dark brown and not black, the outer skirt has a spider web lace texture, and she's not wearing the "leg warmers" which I think came from the garb on the ground behind her.

The lace is probably too hard to simulate, though I do have some extra nylon stocking fabric, that I could try on the skirt to give it texture. Or possibly give her thigh-high stockings which also goes with a goth motif. There's not much you can do with black, white and red colors, although there is a pink laced shirt on the ground behind her as well, and I could make a pink version instead. Maybe she would stop crying if she were wearing pink.. ^^;; poor poor Mikuru.


[ 02.17.09 ]

All right, all the parts have been washed and cleaned up, but there were a ton of these micro pin holes on a lot of the surfaces, especially on the hair pieces. The grey epoxy putty I normally use can't really get into the space, so I tried using thinned Bondo glazing putty which other modelers have had success with.


The Bondo is quite a bit softer than epoxy putty and seems to need multiple applications - or more likely, I'm just not using it right. But being softer, it ends up feathering really well when sanded, just have to restrain from sanding too hard. I've sanded the putty down and then reapplied where needed: rinse, repeat.

The two belt halves have been attached using 2 part epoxy, which is flexible enough so it doesn't shear like CA glue would. It actually feels pretty strong, but I've yet to sand it flush and see if it continues to hold. While this is happening, I think I will start painting the eyes. Haven't done that in a while, so hope I remember how. ^^;;


[ 02.22.09 ]

Some results after sanding down the Bondo, which really shows some of the nastiness of the surface. So far, I'm not too fond of using Bondo though. Even with light sanding, it still feels too soft and sands away much faster than the resin.


It's also not a neutral tone and requires more priming passes to get a uniform base color, which sort of defeats the point of using it as a surface putty. The more you spray, the more detail gets lost - for the hair, it probably doesn't matter, but the other parts, I need to find a better way. The grey epoxy putty was neutral in tone and never had this issue, I just wish it could be thinned.


[ 03.01.09 ]

I started painting some of the parts this weekend. Wasn't sure how the tie would turn out, but it looks pretty good. I bought this Scotch "Artist tape for curves", which is low tack and stretchable and produces a much better seal than masking tape for sharp lines. Cut it in thin strips to make the masks for the stripes on the tie.


Also used it for the curves on the flaired legging with good results, but decided to use masking tape on the triangular flags since this stuff is more expensive. The masking tape ended up lifting some of the red paint in a few spots which will need touch-up, so maybe it would have been worth the better tape to save some trouble. A light mist of black over the red will darken it as well as give it some much needed shading.

I ordered some Aves Apoxie Sculpt and safety solvent to try on the problem parts. It's a non-toxic, thinnable 2 part epoxy putty which I should have tried in the first place, but the Bondo was easier to get a hold of locally. I broke my non-toxic materials rule with the Bondo, so that nasty stuff is staying in the garage forever.


[ 03.09.09 ]

I sprayed a second layer of black this weekend as well as a light misting over the red to darken and shade, then a sealer to protect the paint. The belt buckles and eyelets need painting, then a final finish on these parts. I think the belts will stay glossy, and a satin finish on the rest.


The eyes were painted as well, using orange and brown instead of red. Definitely forgot how to paint them and had to try 3 times before I was happy with them. I think all of the difficult work is done though, so the rest of it should be fairly simple and hopefully go faster.


[ 03.22.09 ]

I ended up drilling out most of the Bondo filler on the main body parts and replacing them with Apoxie Sculpt. These were going to get a light flesh tone and would have needed a dark base layer to mask the Bondo and that affects the color of the flesh on top. I got the white Apoxie, but it actually blended to a light grey, not quite the color of white resin, but still neutral enough to blend in.


I also sprayed the flesh tone on some of the white parts as a pre-shading. It's a very tight shirt and usually the folds would look whiter than the parts that touch the skin. I'm hoping when I spray over with white, it'll give the whole thing a good effect.

The hair took me a few tries to get the color the way I wanted - a rusty orange like the artwork and the anime, but mixing this turned out rather difficult. It usually wanted to turn too red or too brown, but I finally got this look by spraying a base of orange, shading with a muddy brown and then spraying with a light mist of red mixed into the orange.


This is what it looked like before the red was misted over along with the two base colors used. Next is shading the skin and painting the white parts, which I'm still debating if I should do a light pink. Then the final finish coats and assembly.


[ 03.29.09 ]

I decided to go ahead with a light pink after trying out the plain white. It's actually the plain white as a base, but the shading is done in pink and gives the whole thing a pink look. I also finished hand painting the face details and did the shoes in a dark brown leather with black soles.


There's just the black laces on the shirt and skirt left to do and they'll be hand painted. I don't think I'm going to do anything extra since I'm feeling lazy now and haven't found the inspiration. I'll still need to figure out how to attach the chains that came with the kit and make some sort of base. Though she does stand on her own, I'd like it to be a little more earthquake proof.


Here's an interim photo of the body parts with a single layer of white to show how the skin shading came through. It's a good reference for if I want try this again with some other kit in the future. A second layer of white was applied to get a more solid white look and the pink over that. There's still some of the skin tone that shows through on the pink version, but the pink tends to be overpowering so the effect is very subtle.


[ 04.04.09 ]

I finished assembling all of the major parts and attaching the chains. There's not really any guide on where to attach the chains, just a diagram on how to attach the hooks to the belt, so I ended up winging it to create nice looking loops. There's a lot more chain material and hooks in the kit than is used in the PVC, so I have larger loops and a few more loops on the back.


Since the belt has to go onto the main body before it is attached to the skirt, the chains really needed to be attached to the belt beforehand, or else there wouldn't be enough room to work on it without risk of damaging the main body. I just used the top of a plastic bottle to hold the belt while I attached the chains, then transferred the whole thing to the main body before attaching the skirt.

I do like how the pink shading turned out on the main body and am very happy with the result. All that's left is to assemble the major parts and then attach the small ribbons which are a little fragile, so they are going on at the end.


[ complete ]

Figure post is here.

( ... read more » )

Sunday, January 25, 2009

[figure] Angel Rebirth


This is the SOL Models kit of Angel Rebirth from GUNNM/Battle Angel Alita. If you're interested in how this was made, you can follow my work in progress here.

This is resin kit number 6 for me and the largest one I've tackled so far. The body contains multiple parts that are hard to make seamless given how the parts must be assembled. I don't think I want to build another kit with so much skin.. ^^;; I took a long break in between building her, but picking up the airbrush again was pretty simple. I'm glad she's finally done.

Medium: airbrushed acrylics on resin. Scale: 1/6 @ 23cm. 20 photos in this set.


( ... read more » )

Saturday, January 24, 2009

[wip] Angel Rebirth


[ 06.08.08 ]

The next kit on my workbench is this Sol Models figure of Gally from GUNNM (Battle Angel Alita). She doesn't actually have wings in the manga/anime, so this is a conceptual sculpt and there are very few references - just the box picture and this illustration:


I've started removing the flash and marking the areas that need extra clean-up. Despite being an original cast, there are lots of seam lines throughout, including some of the very detailed areas. On close inspection, I count 11 pieces of mould material stuck in the recesses that need to be picked out - that can't be good for the subsequent casts using this mould. It's going to be a lot of work, not as bad as the Mina cast, but it took me a month to clean that kit up and this one has more surface area. She's the largest kit I've worked on so far. At a real 1/6 scale, her face (3.5cm) easily dwarfs Satsuki's (2cm).


[ 06.19.08 ]

I'm not really sure what to make of this kit. I spent some time picking out the stuck mold material and there was a lot more than I originally thought, including some fairly large chunks:


The detail is amazing when it's not near a seam and I expect the seams, but the stuck mold.. I'm afraid to think what the next pull would have been like. Maybe I should be happy that I didn't get the next pull. There's already over 20 pieces I've picked out with a dental pick - some so deep, part of the resin broke trying to get them out.


[ 07.08.08 ]

There hasn't been much progress on this kit, partly due to the Diablo3 trailer causing some nostalgia and a lot of us installed Diablo2:LOD and replayed it. But the other reason is the parts fit is giving me a headache. Here's the two halves of the hair, which don't align at all.


On the top, the red on the left part is how much higher it is versus the right, so it needed to be ground down. You can see how thin the resin is on the right part, it's nearly transparent in the middle. This area needed filling in with putty. On the the bottom, the two halves are almost aligned, but still needs more putty. *sigh*


The body is mostly pinned and final assembly of this is going to be tricky. Due to the parts breakdown, the mechanical arm will have to be fully painted and attached first. Then the human arm attached and puttied to the body for the joint to be seamless, then painted. I'm waiting to pin the head first before trying to align the wings so they don't end up at a bad angle. And that's the just pinning so far. Notice all the red marks that still need sanding.


[ 07.20.08 ]


Finally, here's the pinned kit. The egg shells were a pain as while it is supposed to be cracked, none of the parts fit all that well and needed joining with putty. Some parts are too thin to be pinned and are simply held together by epoxy putty, which should be strong enough since these aren't bearing any load.

She's heavy though and it all balances on the "cord" connecting her to the base at an angle. That area has me worried, as the one joint is bearing the entire load and there's just one pin there. I've been using soft brass pins, but I think this area needs something harder as the brass is bending under the load. A second pin might do it, but there's not a lot of space. While not many parts, this is by far the most complicated kit I have in terms of detail and I'm struggling with planning out how to paint this. Next though, is finally sanding off all those red marks and giving her a bath.


[ 08.02.08 ]

When I started this kit, other than being large at 1/6 scale, I thought it would be a breeze to put together - especially after finishing Satsuki which I thought was the hardest so far. Boy, was I wrong.


The feathered wing comes in two halves and again, they don't quite fit together. I ended up pinning this with 3 pins and a lot of epoxy putty. The wing tip didn't meet at all, so it's been filled in and will need some reconstructive sculpting to blend it together.


The legs have been carefully sanded down. I think the biggest difficulty with this kit is you can't just go all out and sand away because there is a lot of surface texture everywhere that would be lost with aggressive sanding. Consider all the feather detail and the tiny mechanical parts - there's actually corrugated textures on the hoses and weave textures on the metal cables. This means I need to sand down every tiny surface individually while avoiding the textured ones. Definitely not a starter kit and maybe even more advanced than I can handle right now, but I'm going keep at it.

You can still see small red marks showing in the flat areas - these are actually small indents and pinholes in the surface which will need to be drilled out, filled with putty and then sanded flush. It's been taking so long that I miss my airbrush though. I've only been attempting one kit at a time so far, but I'm considering starting something simpler so I can get back to painting.


[ 08.13.08 ]

It's been a while since I posted an update on this kit, but it's still in the very boring and tedious surface cleaning stage. The divots and bad surfaces on the body parts have been drilled out, puttied and wet sanded flat, like so:


Yay, no red marks left on the body! I've started cleaning up the wings and have taken a hack saw to clear out the larger chunks of resin in between the big feathers (marked red).


You can see where I've started making the cuts on the center one. I've seen some photos of finished kits where you can see these chunks have been left in and simply painted, but you have to be looking for them or they're not so noticeable. I was thinking of doing the same, but I didn't think I would be happy with it, so the saw came out.

You might be able to see where the mold line passes through, just above the cut. The feathering doesn't align across the seam, so the short side needs to get sanded down and the feathering redrawn in putty. :P But on the bright side, there's just the egg and the base left to clean up.


[ 08.23.08 ]

Nearly all of the cleanup is done and I've decided to start tackling the more difficult parts to paint. Primarily, I have no idea how to paint the mechanical limbs, but I have an idea what I want them to look like in the end. Looking at how others have done this kit, the mechanical parts range from single solid colors (metal/black) to varying colors of off-flesh parts. What I'm looking for is the metallic framework to show through with flesh-colored veneers.


Not knowing how to get this look, I've decided to experiment on the different parts. For the leg, I hand painted the recessed areas black as a base for the metallic colors and then masked it off. In theory, everywhere that's exposed will get a flesh tone on the surface only. It's turning out to be an awful lot of work though..


For the arm, the whole thing is sprayed with a flesh tone. Masking on top of this will produce the veneers, while the metallics get worked on. In theory, the patches of skin-tone will be protected by the masks. It seems easier, but which will turn out better? If neither do, they might just get stripped and the whole thing started over. Since I haven't painted parts like these before, it's challenging and I'm taking this opportunity to learn from it.


[ 08.31.08 ]

After unmasking the leg, it didn't turn out bad, but not as clean as I would have liked. I decided to apply masks to the skin tone like I was going to do with the arm, so it looks like that method's the winner.


Masks applied over the skin tone veneers leaving the metallic areas exposed, then the whole thing gets sprayed with a black base and metallics on top.


Spraying on top of black lets you get some nice shading on the metallics, the recessed areas stay mostly black and brightens as the area gets exposed. Since the spray needs line of sight, spraying from the angle of light creates some nice effects. You can already see some depth to the metal parts and once dry, running a wet sharp toothpick along the seams will expose more of the black base and it should look even better.

I just added a drop of color to the remaining silver in the cup and sprayed some metallic tones on the fingers, toes and joints. I think this will make it more interesting as all the metals aren't just one color. Since I took the trouble to put on all those masks, I'm going to leave them on while painting the tiny details by hand. Then the masks come off and we can finally see what the result will look like. ^^;;


[ 09.01.08 ]

Here are the details painted and the masks removed. There's some edges and lines where the paint seeped under that need cleaning up still. Overall, I'm pretty happy with the results so far.


The masking came out close to what I had wanted and with the tiny details painted, it all pops out. Two of the panels on the forearm reacted with the masking tape and the surface is really bad. I probably didn't let it cure long enough and it will need to get sanded down and repainted. Since I have to paint the body the same way, I will just repaint it at the same time.


[ 09.09.08 ]

I've been working on the main body and it's been giving me some headaches. I wanted to assemble the parts and smooth the seams before painting to get a uniform piece, but the glue that I've been using for all the other kits just won't stick to this particular resin. It's bizarre, so I've resorted to using epoxy putty to attach the parts:


To get a better bond, the parts have extra holes drilled into them so the putty has somewhere to grip into (like fillings) and the entire outer seams have been carved out with a dremel so the putty can be sanded flush. You can see this in the arm joint, which can't be attached yet, but I wanted to do the carving now so it will just need putty and sanding once the pieces are assembled.

I also broke off the hydraulic at the waist in one of my attempts to glue on the leg. And again, I couldn't get glue to stick to fix the part, so I just replaced it with a brass rod and putty. This part goes into the mechanical leg, so only the surface will be visible and it will look normal once painted.


Fixing bad casting in the base cord as well - a lot of the cables that wind around it are full of bubbles or missing segments (blue). The worst of these have been cut out and replaced with fishing line (red). Once painted, they should also blend in normally.

Next will be wet sanding the body so the seams are smooth and then painting the flesh tone and more mechanical parts.


[ 11.12.08 ]

I finally got around to spraying on the base coat of paint for the main body. It was easy to tell, once the first coat was on, that there were more problems that needed fixing. I didn't think the joint seams were smooth enough, so there's been some more filling and sanding as you can see here.


Some if it is at such odd angles that it's hard to get any sandpaper onto it. I ran out of flesh tone as this kit is much larger than the others and way more surface area to cover. Once I mix more, it'll be another coat and repeat if there's still problems. ^^;;


[ 01.05.09 ]

Happy New Year! It's been quite a while since I've done any work on kits due to other circumstances, but I had some time over the holidays to make some progress. I started with another jar of flesh tone paint and mixed a slightly lighter tone for the main body, which should help differentiate the mechanical parts more. I also sprayed a dark purple (almost black) base color for the hair and wings:


The hair and wings will get a lighter purple sprayed over and I did it in this order since there are so many recessed areas in these parts. The airbrush spray covers with line of sight, so it's hard to get into areas that are deep at angles. Since those areas are already painted dark, they should stay dark when sprayed over.

That's the same idea with the mechanical parts. I started with hand painting the deep areas in black using a brush. Then all the flesh areas get masked with tape and sprayed over with black to get nice coverage.


A base coat of metallic silver is then sprayed and then hand detailed with a thin mix of silver and colors to make new metallic tones. Next will be masking off the mechanical areas so I can spray the left breast with a metallic to fade it in with the flesh. This is it so far.


The mechanical "feathers" are sprayed as well, with a mix of blue, purple and silver. I saw a picture of her in a junk yard with her wings in a dark purple and really like the color scheme, so am painting her this way rather than the white/brown in the box photo. Her hair has a blue/purple tone in the anime as well, so dark purple scheme fits really well for the wings. The feather wing broke at the epoxy joint and is getting fixed, but will get painted the same way.


[ 01.11.09 ]

I removed the masks and cleaned up a few spots where paint had seeped under. It's always a risk when hand painting wet paint over masks, but I hadn't worked on it in so long I forgot about that. ^^;; The face detail and hair are done and just waiting to put a clear coat on these parts before assembly.


This is how the back of the mechanical side turned out, which after assembly will probably never be seen again as most of this detail will get obscured by the eggshell. :P


And here is some color on the wings, which still need more work. I added the light blue to the feather wing to give more color, but it's now off balance with the mechanical wing. I need to find some way to add light blue to the mechanical wing and some gold to the feather wing to help blend the two parts together.


[ 01.20.09 ]

Here's the extra work on the wings. I decided to use a light blue metallic on the edge of both wings to help blend the two parts together. It's hard to see here, but the shafts of the larger feathers also have a slight gold tone to match the metallic framework. I'm pretty happy with it now and they look very nice together.


While spraying the metallics, I started painting the base and the umbilical. The graphite tone is black mixed into silver and the copper tone is red mixed into gold. I'm going to try a black wash on them later to get a more grungy look. I've also attached the limbs to the main body and started the hard part of trying to make the right arm seamless.


The arm joint gets filled with putty, which is sanded down when cured (above). A base layer of paint is brushed on and again sanded down when cured (left). Then a final layer of paint is sprayed with some shading to blend with the existing painted parts (right). It looks ok so far, but I had a hard time keeping the plastic wrap from wanting to touch the wet paint. So there's like two areas that will need some touch up when the paint is dry, but I think it can be carefully done with all the masks removed.


What's left is to finish the egg shell and umbilical, then assembling it all together. Barring any disasters, I think it should be done this weekend. If you've followed this far, I'm so sorry for this ending up being such a long WIP.. ^^;;


[ 01.24.09 ]

I finished painting the shell in a white/grey with a slight purple tint. I think it goes well with the wings. To give it some texture, the exterior was lightly sprayed with a spatter of purple - this was done by turning down the air pressure below where the airbrush would finely atomize the paint. It gives the exterior a grainy speckled look.


The umbilical cable is also done, though I forgot to turn back up the air pressure and the black I was going to simply shade with, ended up spattering as well. After swearing for a minute, I went with the flow and kept painting with low pressure. It ended up looking like soot this way, which actually looks pretty cool so it turned out to be a good mistake.

The shell is epoxied to the base with 3 pins - in the center and where it joins the two pipes. I added a second brass pin to the bottom of the cord since it will be holding a lot of weight, but I've decided not to glue it to the base. It'll be glued to the main body and I'll leave the whole thing in 4 parts (base, body+cord and two wings) so it can be disassembled if necessary. I just need to wait for these parts to dry before assembling (probably tomorrow).

And that's pretty much it, so this should be the last update in this WIP!


[ complete ]

The finished photos are in the gallery here.

( ... read more » )

Gallery Links

Pinky Rin Archer Schpeltor Mikuru Asahina Angel Rebirth Moyashimon Satsuki Ikaruga Yuki Nagato Pinky:St Saber Mina Tsukishiro Haruhi Suzumiya

About This Blog

My photo
Sunnyvale, California, United States

A blog of my hobbies and a place to show progress and finished models. Galleries are embedded as slideshows to reduce page load time, but you can open any album by clicking on its label.

dannychoo.com

figure.fm

Akiba-Station

Through the Looking Glass